2021 年修復 Windows 資源管理器的最佳方法需要重新啟動
概要:本文將向您展示兩種形式 Windows 資源管理器需要重新啟動 issue and the effective methods to fix both the form of error. Besides, we will show you how to recover important data by using Bitwar 檔案救援軟體!
目錄
了解 Windows 資源管理器
Windows 或文件資源管理器是一個文件管理程序,它允許圖形用戶界面訪問您的文件系統。當您在 Windows 上訪問或複製文件和數據時,通常會使用它,但有時會使用它。此外,Windows 資源管理器允許用戶直接訪問硬盤驅動器,顯示所有要查看的文件和文件夾。每當您打開計算機上的任何文件或文件夾時,都會同時啟動 Windows 資源管理器。
Windows 資源管理器需要重新啟動問題概述
有時,當您在計算機上訪問或編輯文件時,可能會遇到提示消息: Windows 資源管理器需要重新啟動.這是許多用戶遇到的普遍問題。
因此,為了更好地理解錯誤,可以將其分為兩種形式,它們是:
- Windows 資源管理器沒有響應。
- Windows 資源管理器已停止工作。
我們將把解決方案分成兩部分,以展示不同類型的解決方案,以不同的方式修復兩種錯誤形式。因此,您可以參考以下最適合您的解決方案的任何一部分 Windows 資源管理器需要重新啟動 error on your Windows system.
在修復之前開始故障排除
Troubleshooting 1: Run Safe Mode
The first and foremost thing is to troubleshoot in safe mode. You have to check whether windows explorer is not responding in Windows safe mode. In case it is working fine in safe mode, it means the error is caused by some third-party application or start-up services.
Troubleshooting 2: Test RAM Memory
Step 1: Launch the Search menu and type in Windows Memory Diagnostic.
Step 2: 打立即重啟並檢查問題(推薦) 並等待該過程。
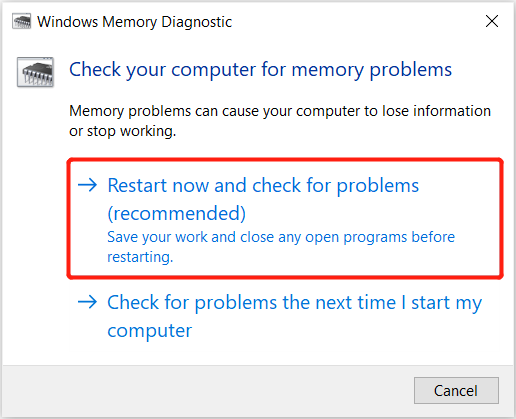
Step 3: Windows 系統會開始檢查內存中的內存 Windows 內存診斷工具.
Step 4: 檢查完成後,轉到 Task Manager 關閉程序以清除 RAM.
Troubleshooting 3:檢查損壞的圖片
Step 1: Go to File Explorer and click 查看標籤.
Step 2: Choose 選項, 並打勾 始終顯示圖標,從不顯示縮略圖 option from the View tab.
Step 3: Then, untick the Display file icon on the thumbnails option.
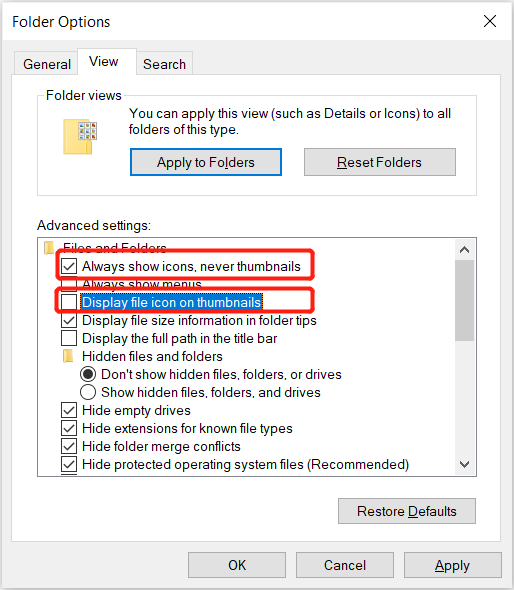
Step 4: 輕敲 行 確認更改。
If the above-mentioned three troubleshooting couldn’t work to get rid of the Windows Explorer needed to restart error, if the problem persists, follow below two parts to get a hint on how to fix the issue.
第 1 部分:Windows 資源管理器沒有響應
As users have reported on Reddit, suppose that they encounter any of the error prompts: Windows Explorer not responding on startup 或 文件資源管理器正在處理它. It will indicate that Windows Explorer is not responding on their computers.
Solution 1: Task Manager
Step 1: In the 視窗 10 任務欄, Right-click 在 Windows 上並選擇 Task Manager 從上下文菜單。
Step 2:默認情況下應選中進程選項卡。如果你選擇它會有所幫助 Windows Explorer from Apps.
Step 3: Choose the 重新開始 選項上 右下 任務管理器的一角。
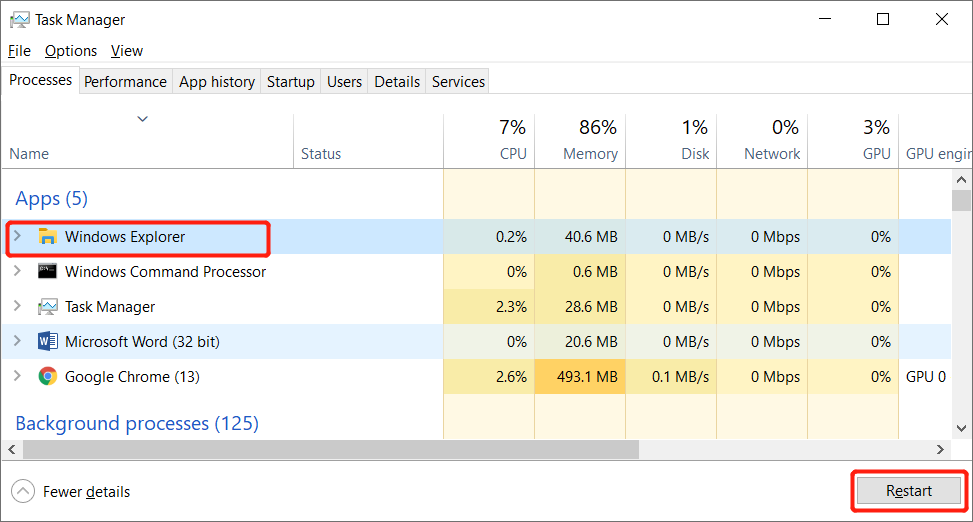
Step 4: 耐心等待 Windows Explorer 重啟。
Solution 2: Command Prompt
If you ask me how to restart windows explorer without task manager, then you can consider this solution. Command prompt can allow you to end and run the explorer.exe on your computer system more effectively and fast.
Step 1: Press Win + S 開始 Search menu.
Step 2: Type in 命令 在搜索菜單中並運行 Command Prompt as administrator.
Step 3: 輸入命令: taskkill /f /im explorer.exe and hit 進.

使用命令提示符運行 explorer.exe 的步驟:
Step 1: Open Command Prompt 通過重複 Step 1 and 2 從上面。
Step 2: Type in the command: 啟動資源管理器.exe.
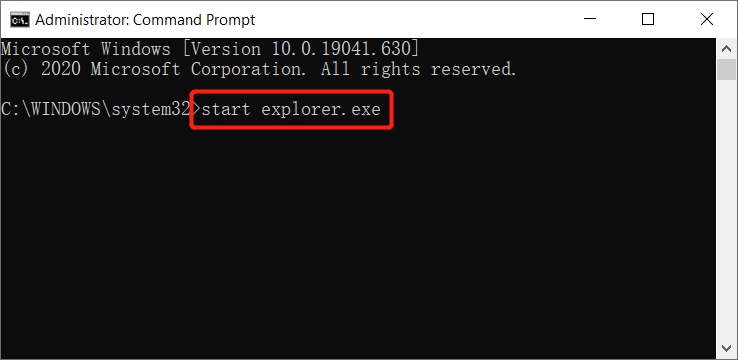
Step 3: 輸入命令後,點擊 Enter 按鈕並等待程序啟動。
解決方案 3:清除文件資源管理器歷史記錄
Step 1: Go to the Search 按下菜單 贏 + S on your keyboard.
Step 2: Type in 控制台 並啟動應用程序。
Step 3: Select 外觀和個性化 選擇 文件資源管理器選項。
Step 4: Click the 清除 按鈕從右下角 General tab.
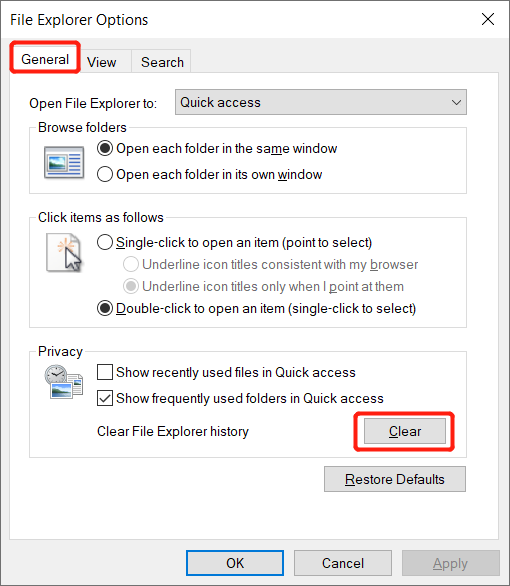
Step 5: Select the 行 等待一段時間再開始 File Explorer on your computer.
解決方案 4:更新或還原 Windows 10
如果上述解決方案未能修復Windows資源管理器需要重新啟動錯誤,那麼您可以按照以下步驟恢復Windows 10。但是,這是一個可能導致數據丟失的解決方案,所以不要忘記備份所有必要的數據為了不失去他們。
Step 1: 確保這件事 System Restore 已啟用,並且至少存在一個還原點。
Step 2: 在裡面 Search 在任務欄的框中,鍵入 系統保護,然後打 進 to launch the System Protection tab.
Step 3: Select System Restore 並按下 下一個 button from the System Restore 窗戶。

Step 4: 選擇一個 還原點,然後按 下一個 按鈕。
Step 5:確認更改並單擊 完.
Step 6: Click on 是的 從彈出窗口繼續 System Restore.
有時可能由於操作系統過時而遇到錯誤,用戶也可以檢查是否有針對 Windows 10 的重大更新來解決此問題。此外,如果您在 Windows 更新後或由於任何其他原因最終丟失了一些重要數據,那麼您可以依靠強大的 Windows 恢復軟件 – Bitwar 檔案救援 取回數據。
從意外刪除/格式化中恢復數據
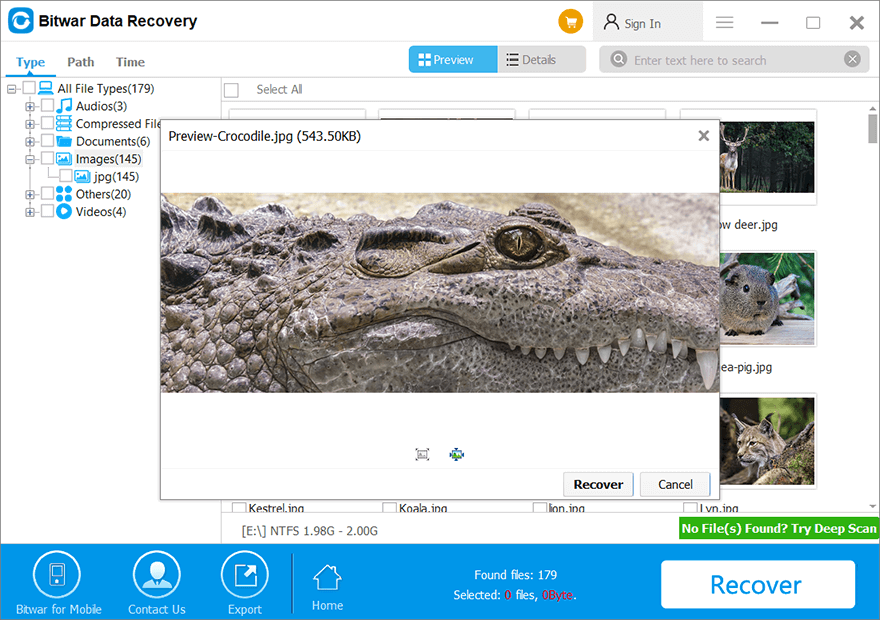
Bitwar 數據恢復軟件 能夠從內部或外部存儲設備恢復任何可能的數據或文件。您可以按照以下步驟輕鬆快速地驗證您的數據,然後決定恢復所需的數據。
請按照以下步驟在 Windows 更新後找回丟失的數據:
Step 1: Go to the Bitwarsoft Download Center 下載並安裝最好的數據恢復工具。
Step 2: Select the drive 或 partition 從您需要恢復丟失的數據的位置,然後按 下一個 按鈕。
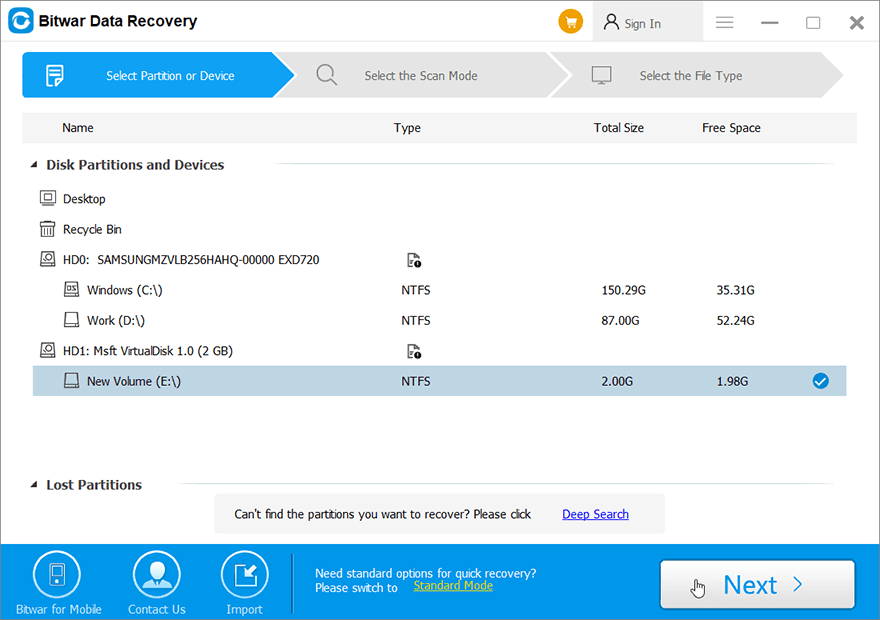
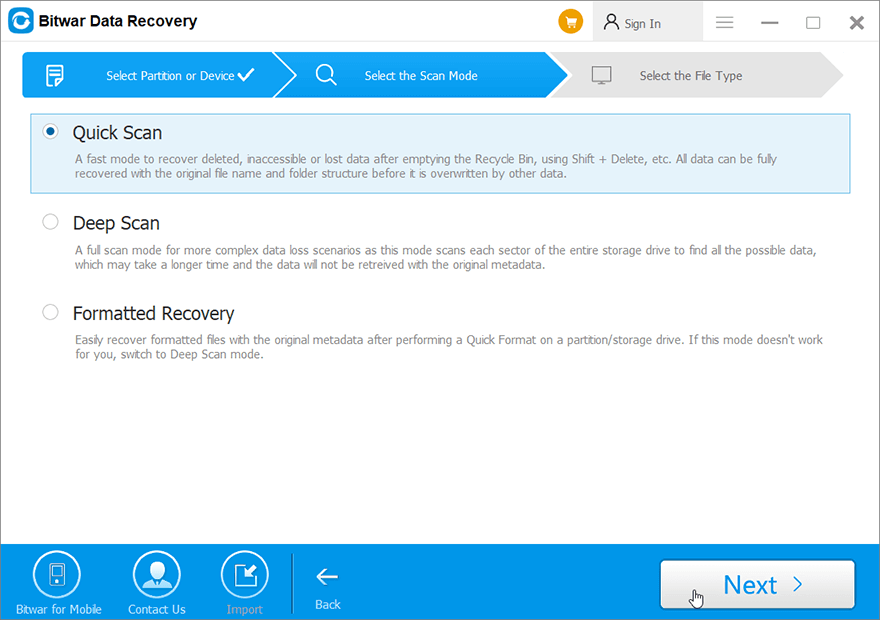
Step 3: Select the scan mode and click on the 下一個 按鈕。
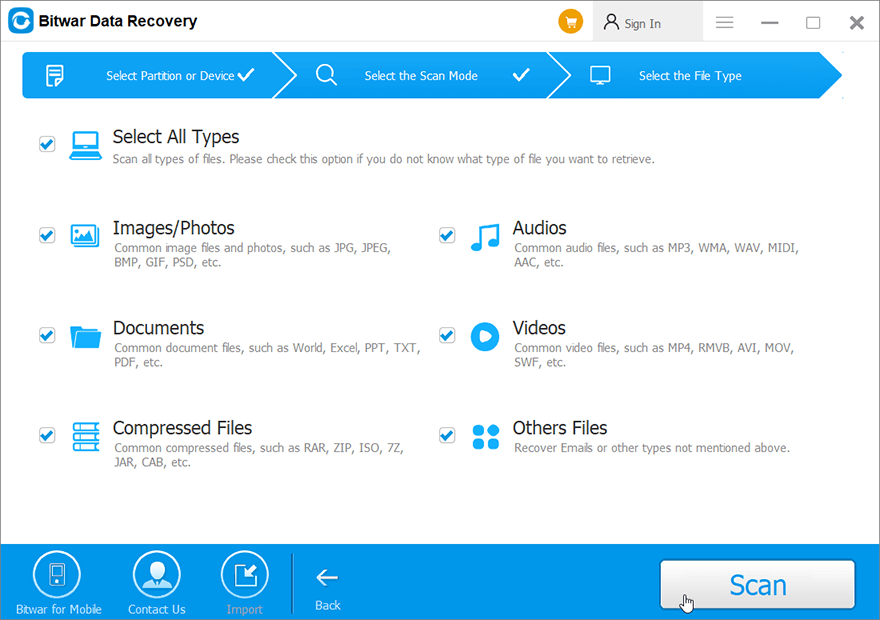
Step 4: Choose the file types 您希望恢復並按 下一個 按鈕。
Step 5: 預覽 所有選定的文件,然後點擊恢復按鈕開始數據恢復過程。
第 2 部分:Windows 資源管理器已停止工作
對於錯誤的第二部分,您可能會遇到錯誤消息: Windows 資源管理器已停止工作 when you are operating or using Windows Explorer on your computer. This error will prevent you from opening, accessing, or copying files and the worse case is a black screen.
導致此錯誤發生的原因有多種,例如:
- 文件系統已損壞或無法匹配或支持其他文件格式。
- 運行的應用程序或軟件存在內部問題
- 視頻驅動程序已損壞或過時。
- 惡意軟件或病毒攻擊
After learning the reasons behind the issue happening on your Windows system, you also need to understand which error messages that pop up to indicate the Windows 資源管理器已停止工作 occur on the computer and then follow the solutions below to fix the issue immediately.
類型 1:Windows 資源管理器已停止工作。 Windows 可以在線檢查問題的解決方案並嘗試重新啟動程序。
類型 2:Windows 資源管理器已停止工作。 Windows 正在檢查問題的解決方案......
類型 3:Windows 資源管理器已停止工作。 Windows 可以嘗試重新啟動該程序。
類型 4:Windows 資源管理器已停止工作。 Windows 正在收集有關該問題的更多信息。這可能需要幾分鐘時間…
方法 1:使用防病毒軟件掃描計算機
If your computer is infected with viruses or malware, application performance problems will be brought. It would be best if you opened your favorite antivirus software without hesitation; use it to scan for viruses and malware that may be hiding on your computer.
方法 2:系統文件檢查器(SFC 掃描)
假設您的文件系統是問題的原因,那麼您將需要打開系統文件檢查器工具來解決它。
Step 1: Launch Command Prompt as administrator from the search 上面第 1 部分解決方案中提到的菜單。
Step 2: Type in the command: sfc /scannow and press 進.
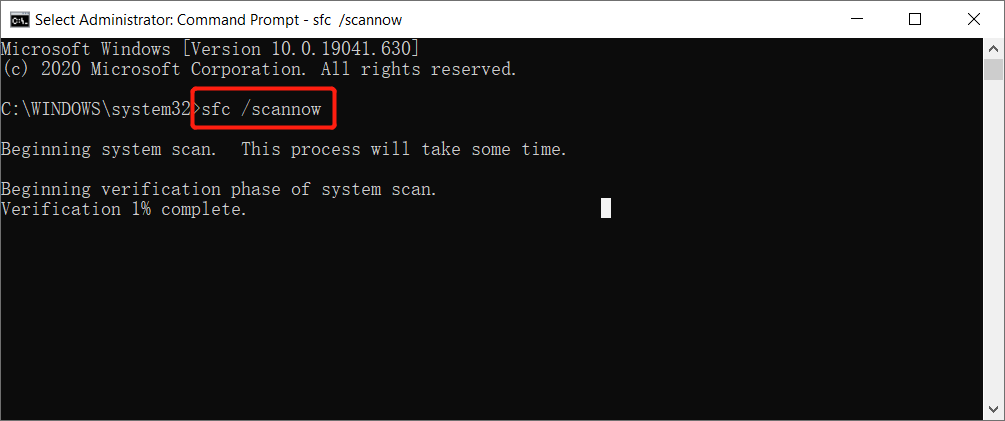
Step 3: 請耐心等待該過程完成。
方法 3:啟動安全模式
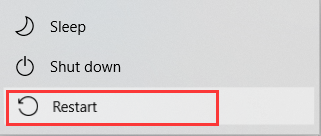
Step 1: 重啟你的電腦 Safe Mode.
Step 2: Perform regular operations with your computer.
Step 3:嘗試配置或訪問您擁有的文件 Windows 資源管理器已停止工作 錯誤並檢查問題是否已解決。
Step 4: 如果在 Safe made 過程中仍然出現錯誤,則必須按照 乾淨啟動故障排除 下面的方法。
方法 4:乾淨啟動故障排除
Step 1: Log in 到您的計算機系統作為 administrator.
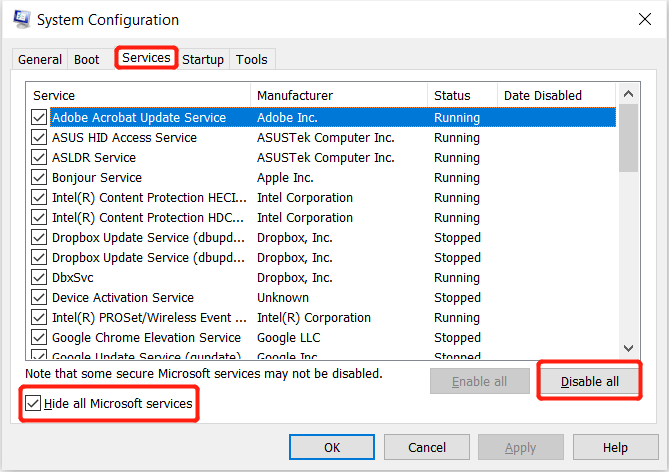
Step 2: Open Search menu and type in msconfig to open 系統配置。
Step 3: Go to the Services 選項卡和勾號 Hide all Microsoft services.
Step 4: Tap on the Disable all 選項並繼續 Startup tab.
Step 5: Choose Open Task Manager 和 right-click 在列出的每個項目上繼續選擇 Disable 菜單中的按鈕。
Step 6: 退出 Task Manager 並返回到啟動選項卡以完成 行 按鈕。
Step 7: Restart 你的電腦。然後, run, install, or 卸載 乾淨啟動部分中的應用程序。
Step 8: Lastly, reset 故障排除後,您的計算機以檢查錯誤是否已修復。
方法 5:更新過時的視頻驅動程序
每個人都需要更新或確保視頻驅動程序始終是安全的最新版本,因為 Windows 資源管理器可能會因視頻驅動程序過時或損壞而停止工作。
Step 1: Open Search menu and type 更新.
Step 2: Select 檢查更新 and click on 檢查更新 again.
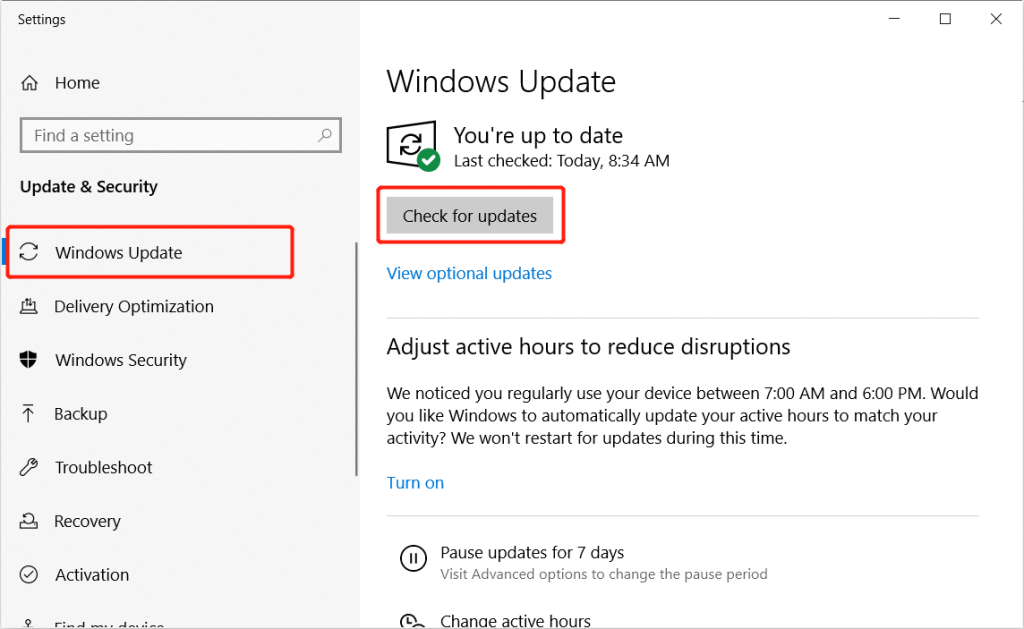
Step 3: 請耐心等待,如果有新的顯卡驅動更新,會自動下載安裝。
Step 4: 重新啟動計算機以檢查錯誤是否已解決。
方法 6:更改文件夾選項
Step 1: Launch the File Explorer and tap on the View 待定
Step 2: Choose the Options 菜單和更改 打開文件資源管理器 to This PC 在 General tab.
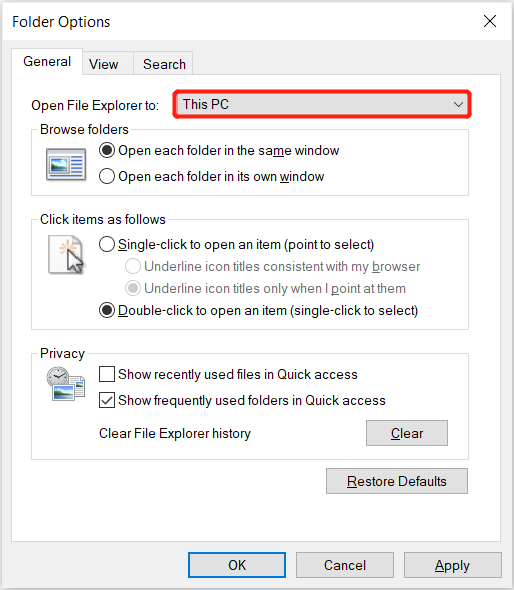
Step 3: Click 行 應用更改。
快速修復!
Windows Explorer’s restarting loop 是許多 Windows 10 和其他 Windows 用戶目睹的常見問題。當這個問題發生時,它會限制用戶訪問系統的硬盤驅動器和存儲在其中的數據。
但是,出現此問題時無需擔心,因為上述解決方案將幫助您解決問題。如果您因任何意外原因丟失重要數據,請使用 Bitwar data recovery software 安全地取回所有數據。
上一篇
[最新] 如何使用命令提示符 (CMD) 恢復丟失的文件 Summary: This article will present you two forms of Windows Explorer needs to restart issue and the effective methods to...下一篇
快速修復“當前正在使用此設備”並安全彈出提示 Summary: This article will present you two forms of Windows Explorer needs to restart issue and the effective methods to...
關於 Bitwar 數據恢復
3 Steps to get back 500+ kinds of deleted, formatted or lost documents, photos, videos, audios, archive files from various data loss scenarios.
閱讀更多
