如何修復藍屏錯誤 0x0000007f(意外內核模式陷阱)
概要: Many Windows users may have encountered a unique blue screen of death error, 0x0000007F. Although users faced with this problem either dismiss it or cleave to the conviction that the blue screen 0x0000007f error is nothing but a minor error. However, considering the possible causes, this error may well suggest that the computer has already run into some critical issues. Moreover, this stop error could wind up cutting short users’ work and cause data loss problems, don’t fret if you are confronted with the error. In this article, we will show you how to get rid of it and if necessary, bring back your lost data resulting from it with the help of Bitwar 檔案救援.
目錄
0x0000007f 錯誤的原因

根據我們在網上查到的大量案例,常見的原因有以下幾種:
- 驅動程序與計算機不兼容
- RAM 模塊故障
- 不匹配的內存模塊
- 主板故障
- 由 HP 公用事業引起的溫度峰值
- 內核空間不足
- 系統文件損壞
如何修復 0x0000007f 錯誤
Solution 1: Reboot the Computer
由於 Windows 操作系統能夠修復一些 BSOD 錯誤,因此重新啟動計算機是一個非常簡單但明智的解決方案。如果錯誤代碼沒有再次出現並且計算機運行良好,那麼該錯誤很可能是由一個小問題引起的。如果錯誤仍然存在,您可以嘗試下面列出的其他解決方案。
解決方案 2:使用防病毒軟件掃描計算機
雖然病毒攻擊不是我們之前列出的常見問題之一,但有用戶反映,在他們定期掃描並刪除一些可疑文件和惡意病毒後,計算機已經開始正常工作。此外,這也是一個簡單的解決方案,因為每個用戶都可以使用內置的防病毒工具 Windows 安全來掃描計算機,如下所示:
Step 1: Type in Windows Security in the search bar and then open it.
Step 2: Click on Virus & threat protection.
Step 3: Click on 掃描選項.
Step 4:向下滾動以勾選您想要的掃描類型旁邊的框。
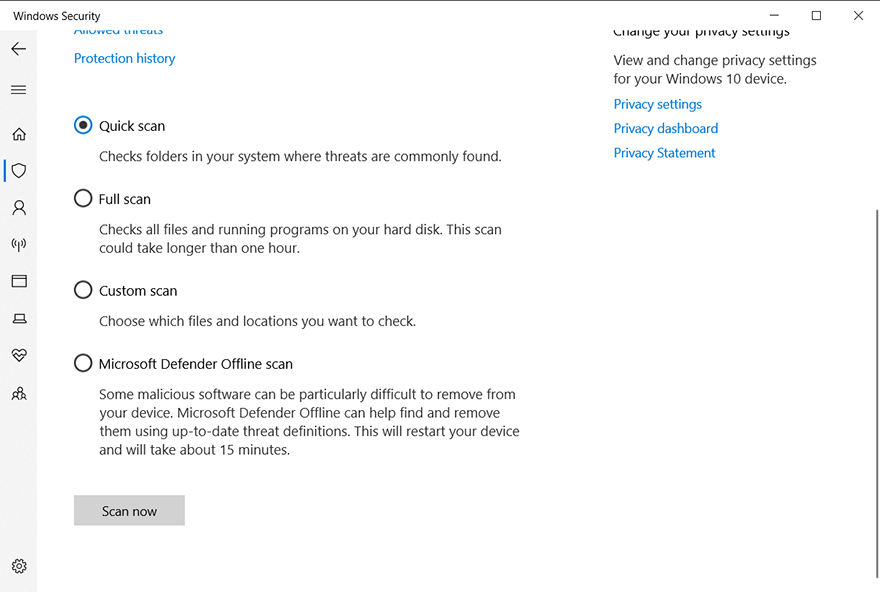
Step 5: Click on Scan now 開始掃描。
解決方案 3:運行 RAM 內存測試
由於 0x0000007F 問題的幾個原因與 RAM 密切相關,您可以運行 RAM 內存測試來檢查它是否正常工作。您可以使用內置工具內存診斷來檢查您的 RAM:
Step 1: 按 Win + Q 然後輸入 Memory 診斷.
Step 2:右鍵單擊應用程序,然後選擇 Run as administrator.
Step 3: Click on 立即重新啟動並檢查問題(推薦)。
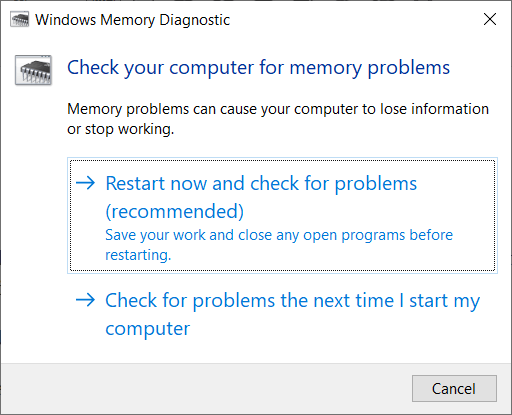
Step 4:按照說明開始診斷。
解決方案 4:卸載 IDE ATA/ATAPI 控制器
在我們調查了 0x0000007F 的原因後,我們發現一個名為 iaStor.sys 的損壞文件很可能會導致 BSOD 以及 0x0000007F 錯誤代碼。據信,這是由於與 IDE / ATA / ATAPI 控制器不一致造成的。如果您的 PC 中損壞的文件是造成問題的原因,您可以使用設備管理器卸載每個 IDE、ATA 和 ATAPI 驅動程序,讓您的計算機自動安裝新的和通用的驅動程序。請參閱以下說明以了解如何執行此操作:
Step 1: Press Win + R to open the Run box.
Step 2: 輸入 devmgmt.msc 然後回車打開 Device Manager.
Step 3:在設備管理器窗口中,向下滾動以查找並展開 IDE ATA/ATAPI 控制器 entry.
Step 4: Uninstall every driver under the IDE ATA/ATAPI controllers entry by right-clicking on them and then selecting Uninstall device.
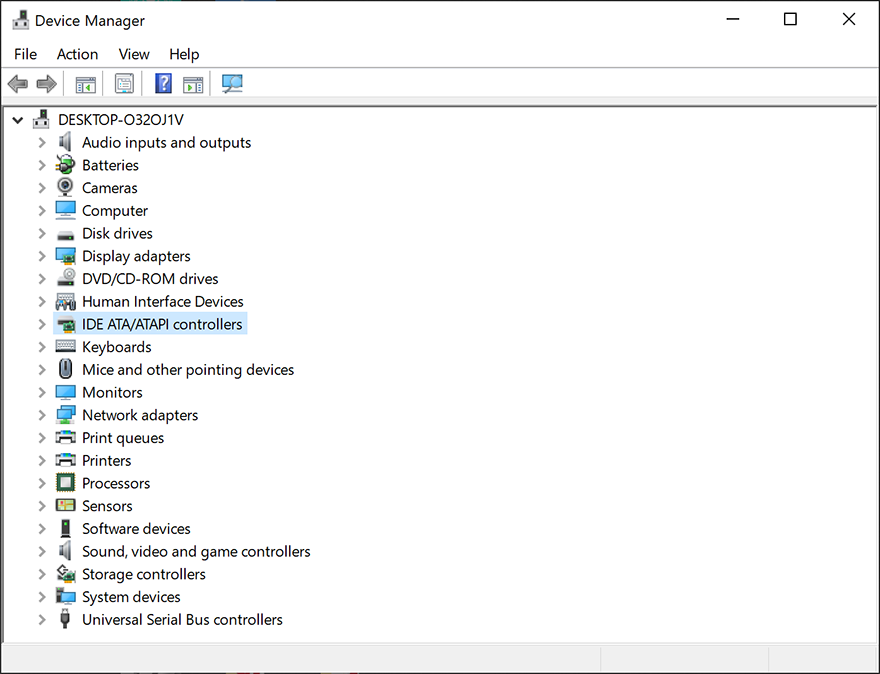
Step 5:重新啟動計算機,讓計算機自動安裝新驅動程序。
解決方案 5:禁用/卸載第三方防病毒軟件
許多用戶報告說,一些防病毒軟件通過阻止重要的內核進程在保護計算機方面做得太過分,因此帶來了 0x0000007F 錯誤。要檢查您的計算機是否以這種方式癱瘓,您可以禁用實時保護。如果禁用防病毒軟件不能解決問題,那麼您可以嘗試卸載它。請參閱以下步驟以了解如何完全卸載防病毒軟件。
Step 1: 按 Win + R 打開運行對話框,輸入 appwiz.cpl and then press 進.
Step 2: In the Programs and Features 窗口,向下滾動以查找您正在使用的防病毒程序。
Step 3:找到它後,右鍵單擊它,然後選擇 解除安裝 on the drop-down menu.
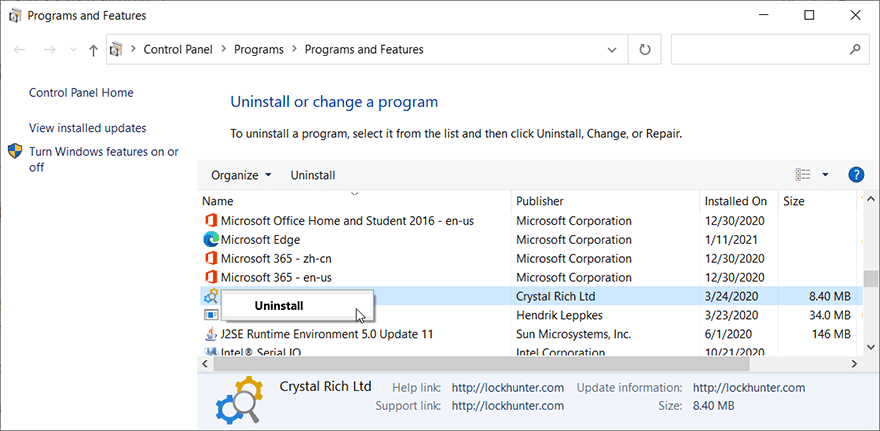
Step 4:按照軟件提供的說明卸載它。
Step 5: Reboot the computer to see whether the error persists.
解決方案 6:禁用/更新驅動程序
如果在安裝新驅動程序後出現 0x0000007F,則此錯誤很可能是由不兼容的驅動程序造成的。要解決此問題,您可以通過設備管理器手動禁用/更新新驅動程序。
Step 1: Press Win + Q, type in Device Manager and then press Enter to open it.
Step 2:滾動窗口以查找已安裝新驅動程序的設備。
Step 3:展開設備的入口。
Step 4: Right-click on the driver and then select Disable 設備。
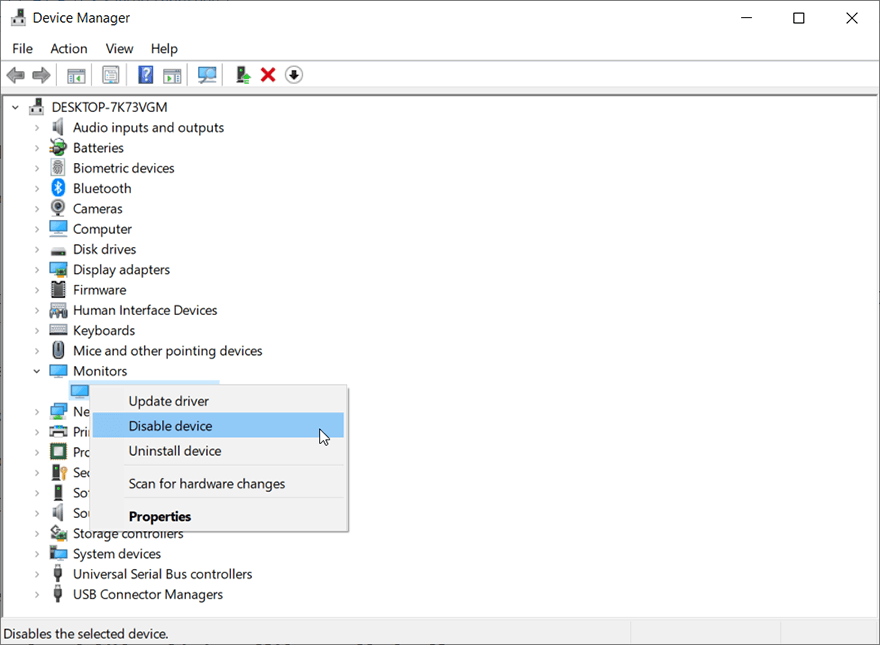
Step 5:檢查禁用它是否可以解決錯誤。如果沒有,請嘗試卸載新驅動程序。
Recover Lost Files Using Bitwar Data Recovery
正如我們之前提到的,除了此錯誤帶來的意外 BSOD 之外,緊隨其後的是數據丟失。雖然藍屏錯誤不一定會導致數據丟失,但它可能會縮短您當前的工作,使您在重新啟動計算機後無法找到這些工作。為了幫助您解決這個問題,我們向您推薦我們的用戶友好且可靠的恢復工具 Bitwar Data Recovery。借助它,您可以輕鬆找回丟失的數據。
Step 1: 從我們的下載 Bitwar Data Recovery official website.
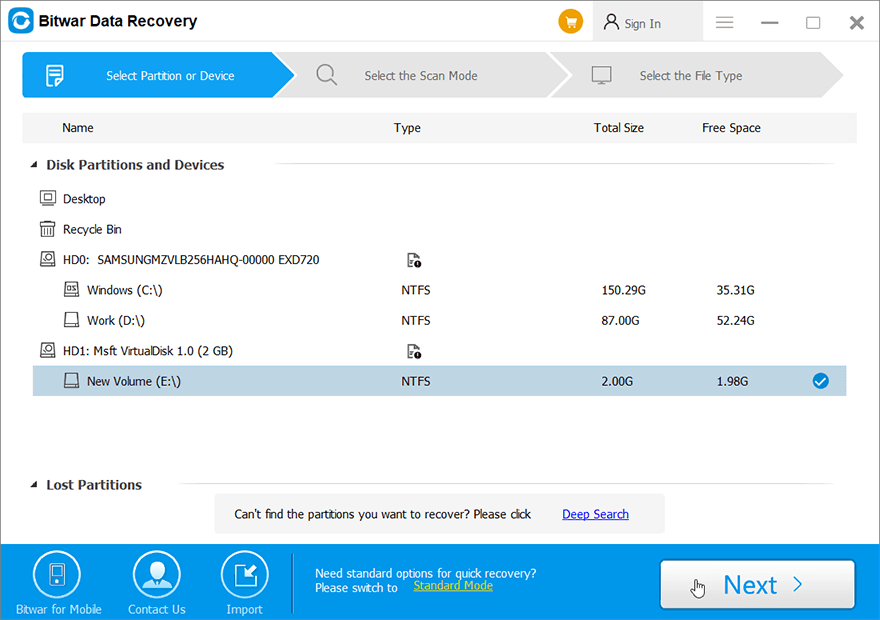
Step 2:之後,啟動恢復程序並選擇要從中恢復丟失數據的驅動器,然後按下一步按鈕繼續。
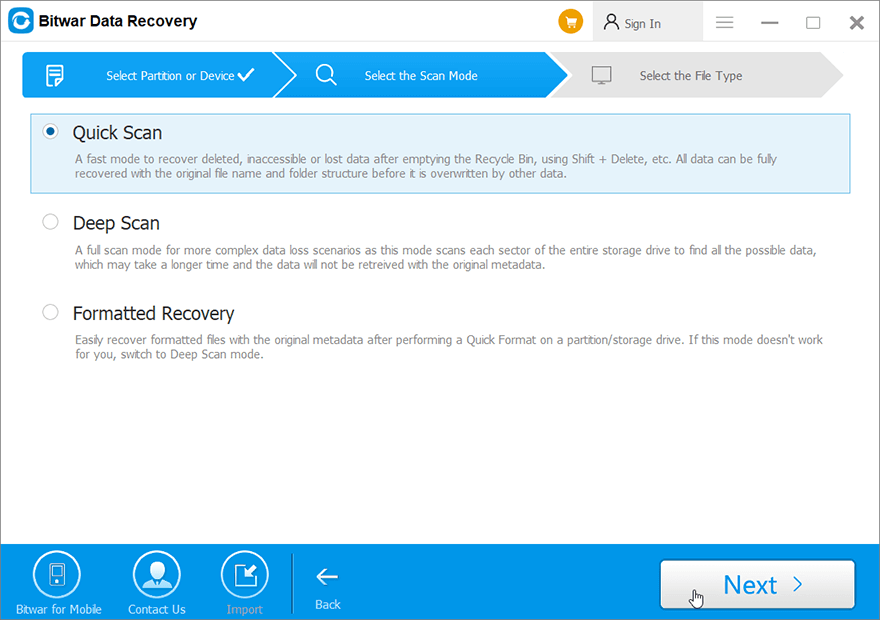
Step 3:選擇掃描模式。對於初學者,我們建議 快速掃描, which is capable of recovering most files. If it doesn’t serve you well, you can try 深層掃描 next time.
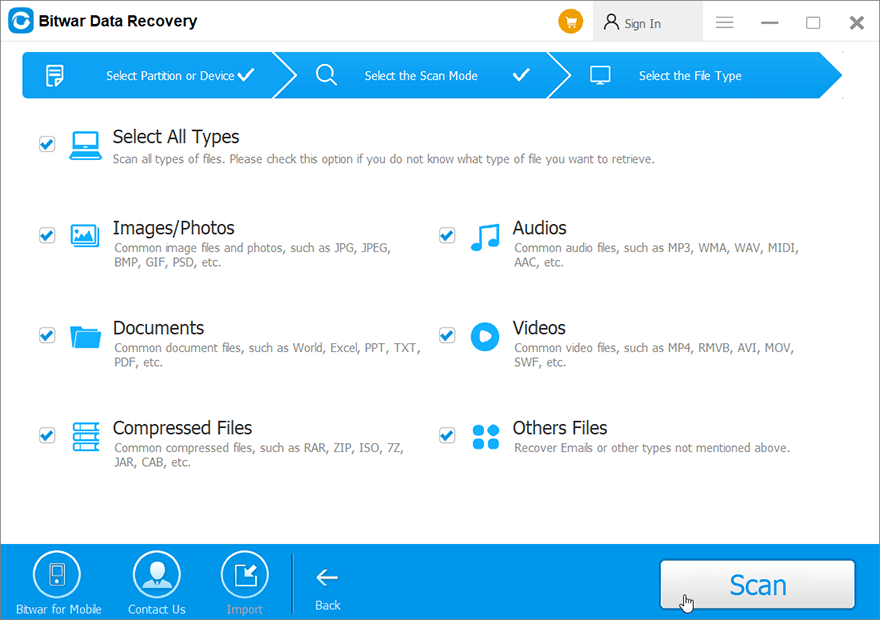
Step 4:現在選擇要檢索的文件類型,然後按 下一個按鈕。
Step 5: 預覽 all the selected data.
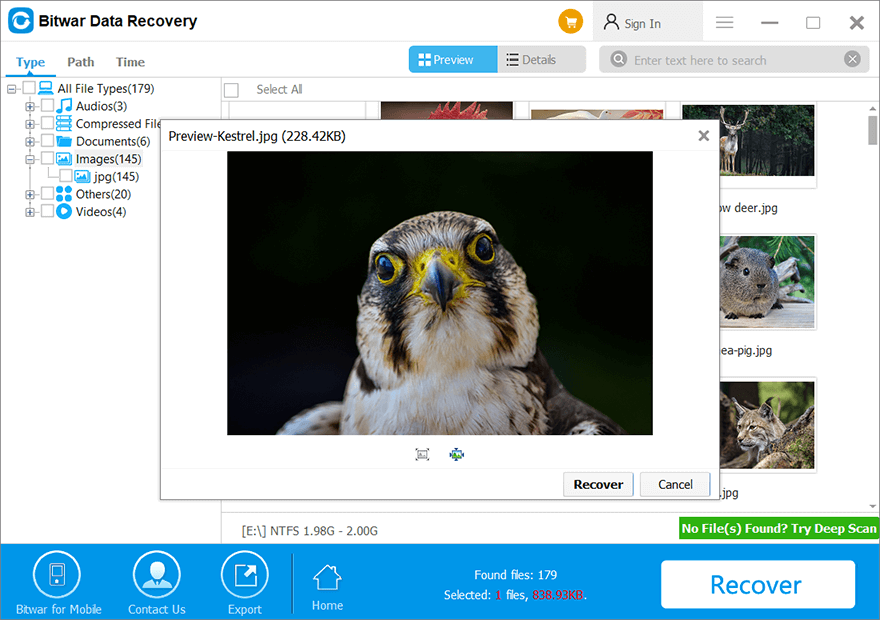
Step 6: Lastly, after choosing and previewing the files you want, click on the 恢復 button to begin the data recovery process.
結論
0x0000007F 錯誤是普通用戶在使用計算機時可能會遇到的棘手的藍屏死機問題之一。在本文中,我們介紹了 6 種常用的解決方案來幫助用戶修復它。像我們之前討論過的其他 BSOD 錯誤一樣,例如 kernel data inpage error 和 0x100000ea,這個錯誤很可能會導致數據丟失。因此,在這些解決方案之上,我們還向用戶展示瞭如何使用有效且可靠的恢復工具 Bitwar Data Recovery 來找回丟失的數據。
上一篇
7 Recovery Methods to Restore Folders Disappeared From Desktop On Mac 總結:許多Windows 用戶可能遇到過一個獨特的藍屏死機錯誤,0x0000007F。雖然用戶面臨這個...下一篇
How to Fix the Failed to Format the Selected Partition Error [0x8004242d] 總結:許多Windows 用戶可能遇到過一個獨特的藍屏死機錯誤,0x0000007F。雖然用戶面臨這個...
關於 Bitwar 數據恢復
3 Steps to get back 500+ kinds of deleted, formatted or lost documents, photos, videos, audios, archive files from various data loss scenarios.
閱讀更多
