8 Common Windows 11/10 Issues And Solutions
Table of Contents
Overview of Windows 11/10
Windows 11 is the operating system of Microsoft’s Windows NT family, which came out in 2021 as a successor to Windows 10. The official version is released on October 5, 2021, and is open to eligible Windows 10 devices for a free upgrade.
Windows 11, the first major Windows release since 2015, improves on its predecessor’s user interface to follow Microsoft Fluent Design System. The redesign focuses on ease of use and flexibility, with new productivity and social features and security and accessibility updates. Windows 11 fixes some of the flaws on Windows 10.
Since Windows 11 requires complete reinstallation, computers may also come across some of the same problems you will encounter on Windows 10. Meanwhile, the Windows upgrade process may get stuck or fail because of driver issues, incompatible applications, custom configurations, or hardware issues.
So our article will focus on some of the Windows 11/10 issues you may encounter during and after the installation and the possible methods.
Windows 11/10 Common Issues and Solutions
Issue 1: Windows Update Issue
If you’re encountering issues installing Windows 11/10 through the Windows update tool, don’t panic. Windows has a built-in troubleshooter to identify many problems. So you can use this tool to reset the Windows Update app to activate the installation. Please operate the following steps to solve the Windows Update issues:
- Press the Win+I shortcut to open the Windows settings window.
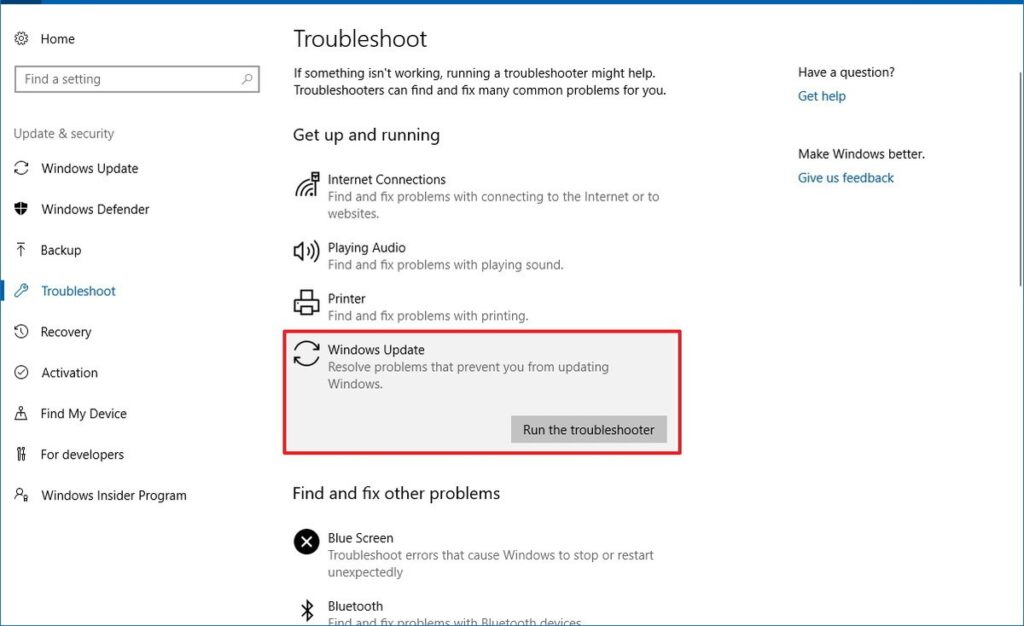
- Click Update & Security and Troubleshoot.
- On the right side of the window, click Windows Update, then click the Run the troubleshooter option appearing below.
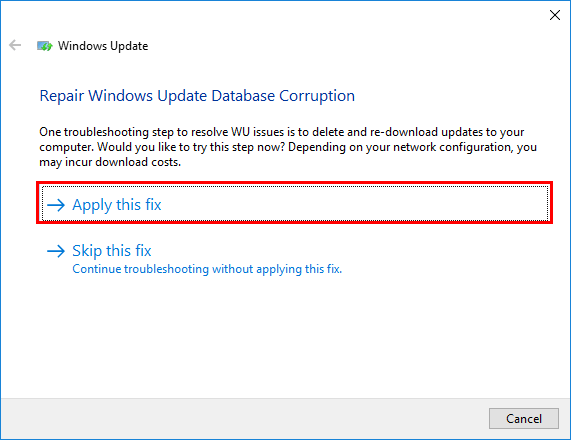
 Follow the instructions and click Apply this fix when finding a solution.
- Restart your PC, and try updating Windows 11/10 again.
Issue 2: Windows 11/10 Startup Issue
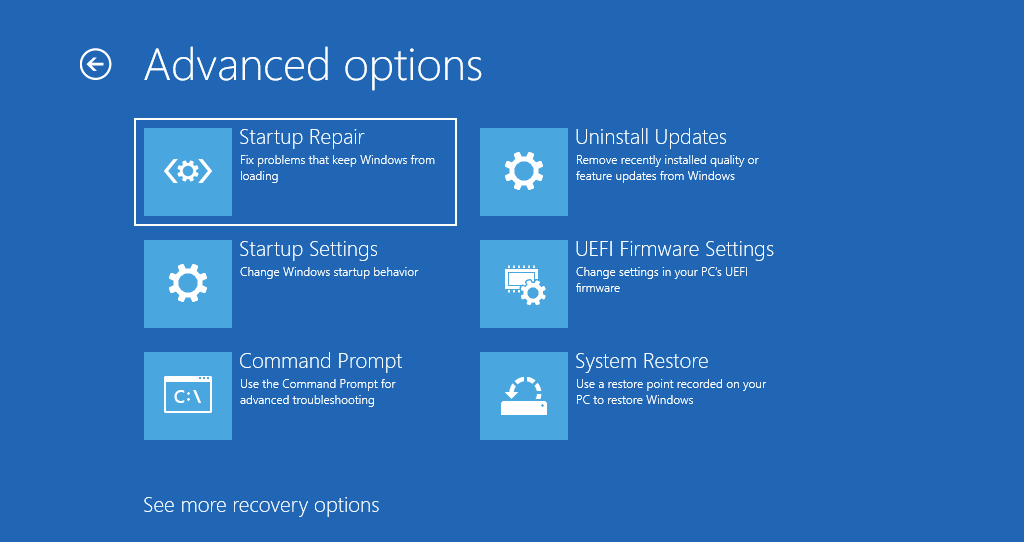
If you come across the startup issues such as Windows 11/10 stuck on the boot screen, and you can’t enter the desktop. Then you can use the built-in Windows startup repair from Windows Recovery Environment (WinRE), which can fix most computer failure when it does not work well.
- Hold down the power button for 10 seconds to turn off your PC, then press the power button to turn on your PC.
- When the Windows logo appears, operate the step above twice.
- After repeating the steps three times, Windows will ask you to choose Restart or Advanced options, here choose Advanced options.

- Now you are in the WinRE, click Troubleshoot, then click Advanced options.

- Finally, click Startup Repair.

When the repair process is done, restart your Windows to see whether the problem is solved.
Issue 3: Disk Errors
Command Prompt is one of the essential built-in features on Windows 10. Users generally can use some command-line to fix different OS-related problems. Among these, you can use the CHKDSK command to check and fix disk errors. Follow the steps below to learn how to run CHKDSK tool:
- Open the Run box by pressing Win + R shortcut and then type cmd.
- In the appearing window, choose Run as administrator to open Command Prompt.
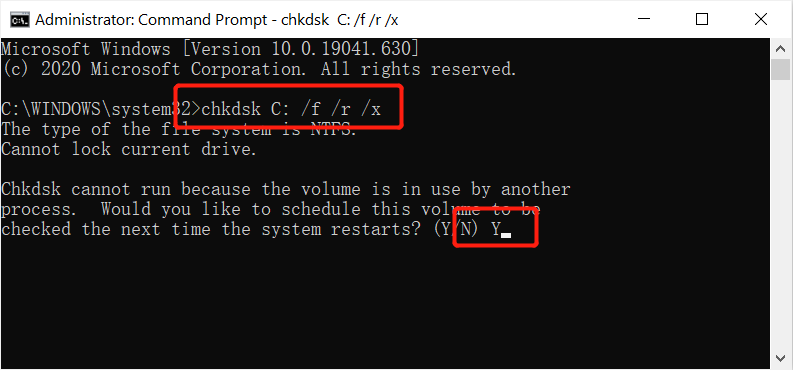
- Type the command chkdsk C: /f /r /x in the Command Prompt and then press Enter. (Replace C with your drive letter)
- If the Command Prompt shoots a message to ask you if you want this volume to be checked next time the system restarts, type Y and hit Enter.

After you operate the steps above, the computer will automatically check and fix disk errors like system errors and mark hard drive bad sectors.
Issue 4: Corrupted System Files
The other most commonly used command is SFC, whose full name is System File Checker. It is a system utility tool that helps users to scan and restore any data corruption on the Windows file systems. If you receive error messages about missing DLL files, or you experience the dreaded “blue screen”, then it’s definitely right to run SFC. To run the SFC command, please follow the steps below:
- Run the Command Prompt as administrator.
- Type the command sfc/scannow in the Command Prompt, and press Enter key.

After that, the SFC command will begin to scan all protected system files and replace the corrupted files with cached copies. If you come across the issue of SFC not working on Windows, you can click the link of the article to look for methods to solve: Best Solutions To Solve SFC Is Not Working On Windows.
Issue 5: Corrupted System Images
DISM command is used to repair for Windows 11/10 system image, including three options: CheckHealth, ScanHealth, and RestoreHealth. Among these commands, the RestoreHealth command is the most commonly used, which you can use to scan and repair common issues automatically if there are problems with the system image, especially computer crashes and freezes.
- Open the Run box by pressing Win + R shortcut and then type cmd.
- In the appearing window, choose Run as administrator to open Command Prompt.
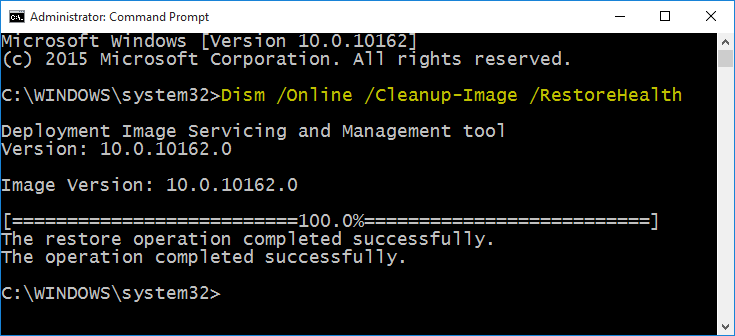
- Type the command DISM /Online /Cleanup-Image /RestoreHealth in the Command Prompt and then press Enter.

Once you complete the steps above, Windows 11/10 will connect Windows Update online to download and replace corrupted files.
NOTE: Do not close the Command Prompt window until the process is 100% complete no matter what command is being operated.
Issue 6: Recover Lost/Deleted Data
Common causes of computer data loss include accidental deletion, overwriting files, sudden power off and hard drive wear or sudden failure. Therefore, we generally recommend users back up files regularly so that they can recover data if it is lost/deleted. For data that has not yet been backed up, you can use our specialized data recovery software: Bitwar Data Recovery Software to recover lost/deleted data.
To recover lost files, please follow the steps below:
- Go to Bitwarsoft Download Center, download and install the data recovery software.
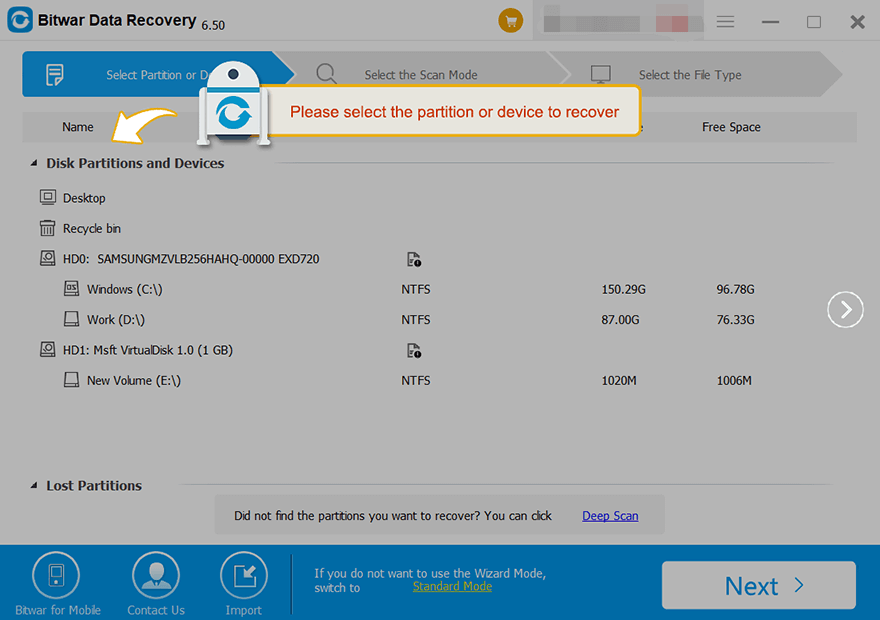
- Open the data recovery software and choose the drive where you wish to recover your lost files.

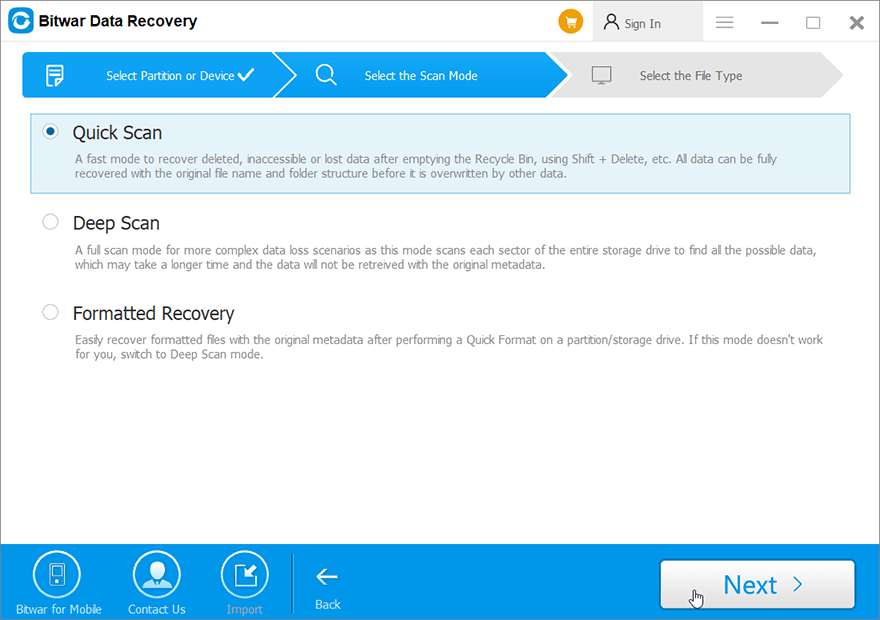
- Choose the Quick Scan mode. If the lost data can’t be found, you can choose the Deep Scan mode. It performs an in-depth search to look for data in every corner of your drive. After that, click on the Next button.

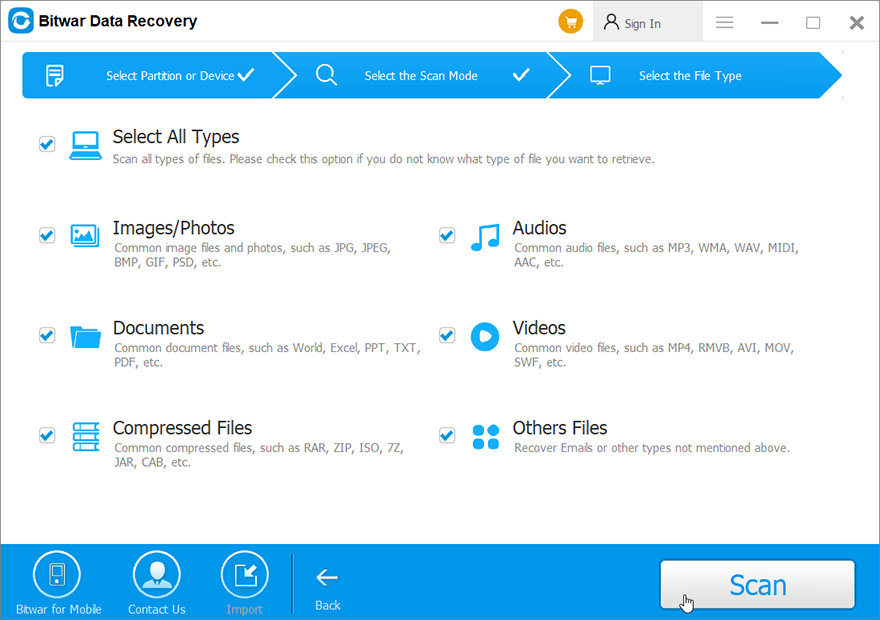
- Choose your target file type and click Scan.

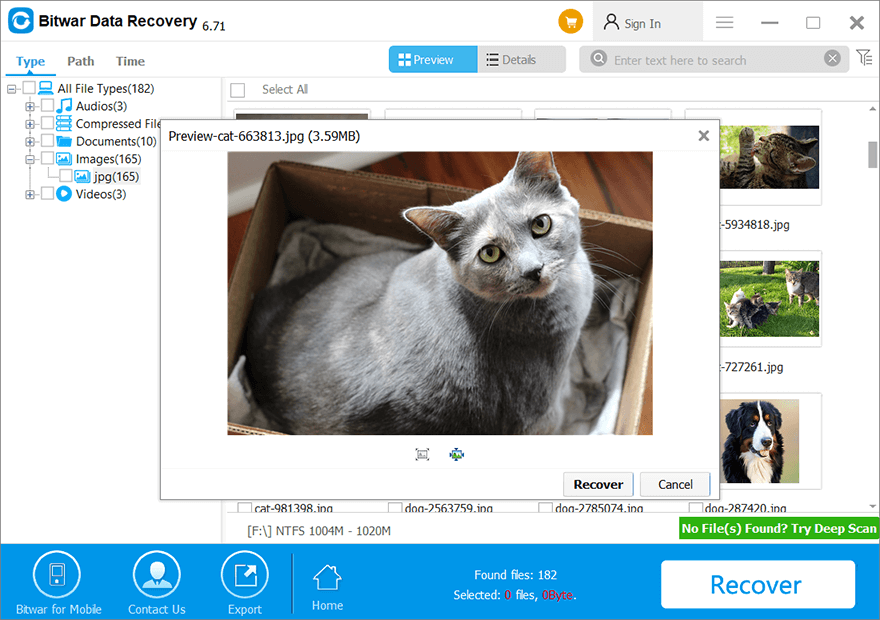
- Preview and choose the target files, then click Recover and save the data into different devices or partitions.

Issue 7: Reset Your PC Settings
“Reset this PC” is a built-in feature of Windows 11/10, which can repair some serious system issues. When Windows 10/11 always breaks down suddenly, gives you strange errors or performs slowly, users can use the built-in feature to reset their computers to factory settings. This means all your installed programs and settings will be deleted, which ensures that you have a brand new system.
- Press the Win+I shortcut to open the Windows settings window, and choose Update&Security.
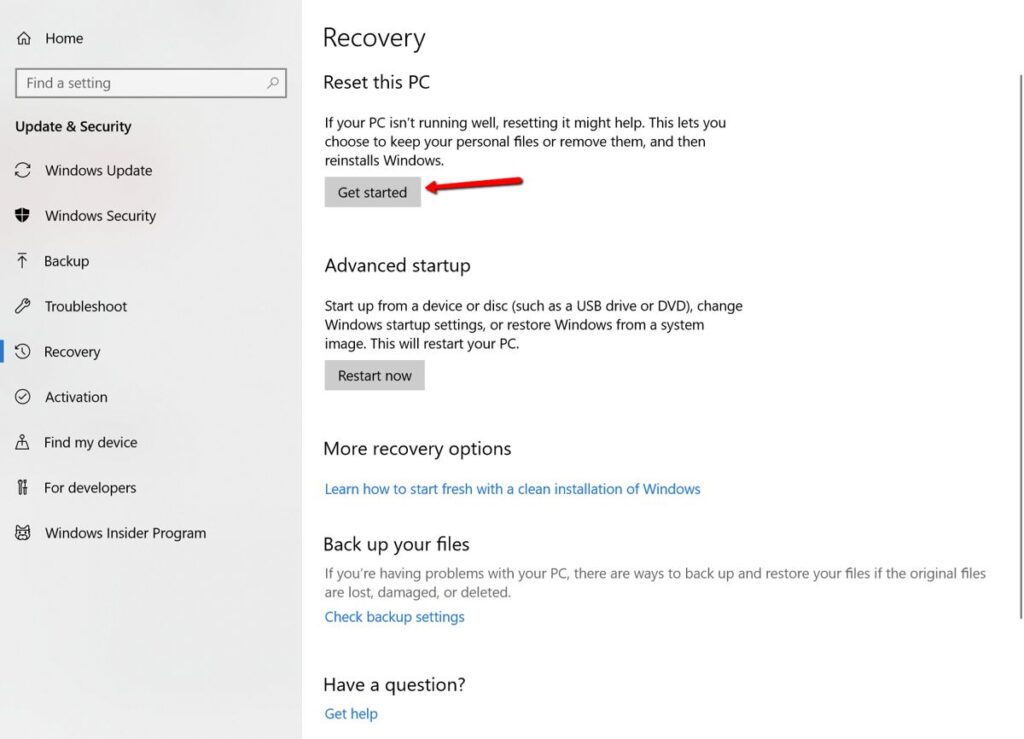
- Click Recovery in the left pane, then three main options will appear in the right pane, including Reset this PC, Go back to an earlier version of Windows 10, and Advanced startup.
- Click Get started under Reset this PC.

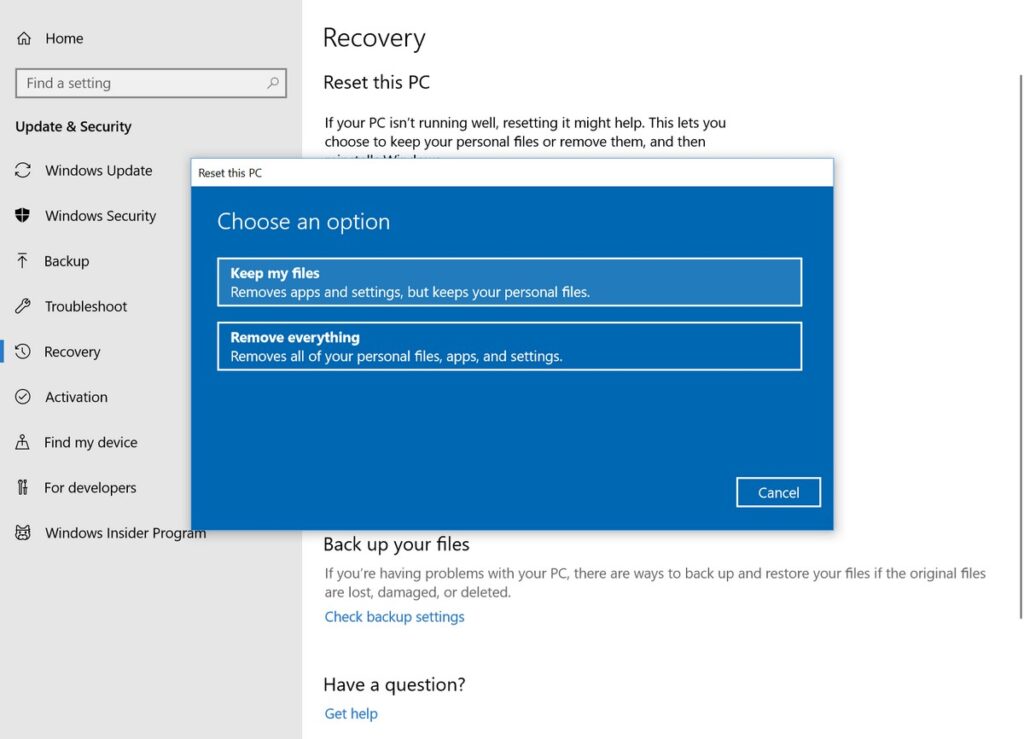
- A window will pop up to ask you to choose Keep my files or Remove everything, depending on whether you want to keep your data files intact. Either way, all of your settings will return to their defaults and apps will be uninstalled.

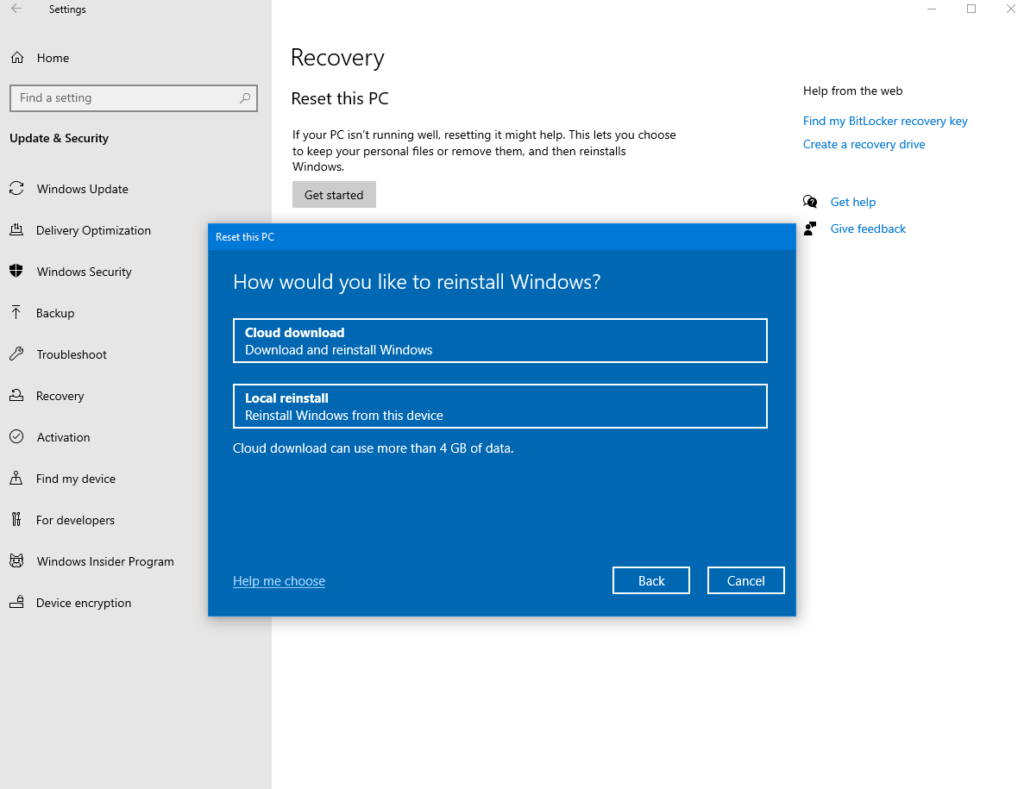
- When the window that asks you how to reinstall Windows appears, choose Local reinstall. If you cannot reinstall Windows via Local reinstall, you can choose Cloud download to reinstall Windows.

- Next, follow the appearing prompts to choose all options and your computer will restart after the reinstallation is completed.
Issue 8: Windows 11/10 Booting Slowly
The issue Windows booting slowly has occurred in previous Windows, and users also complain that windows 11/10 booting is slow after using a period of time. There are many reasons for Windows 11/10 booting slowly including low memory, malware or damaged drive. If rebooting your PC can’t solve the issue, you can try the following steps:
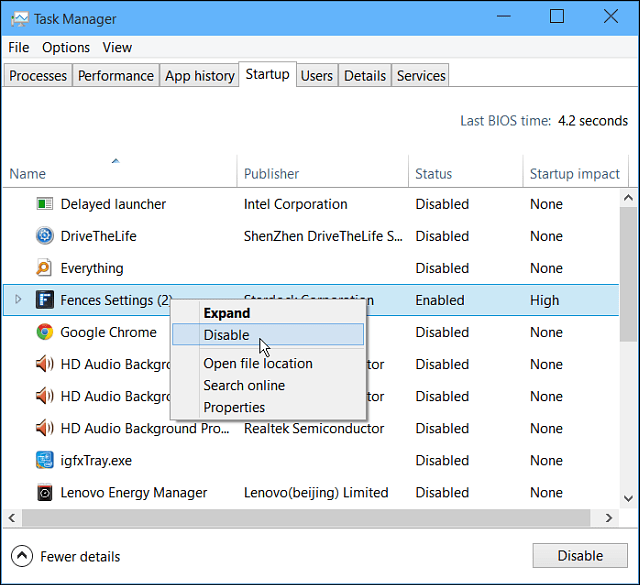
- Type taskmgr in the search box, and choose Task Manager.
- In the Task Manager window, open the Startup tab and disable the running background apps when booting the PC.

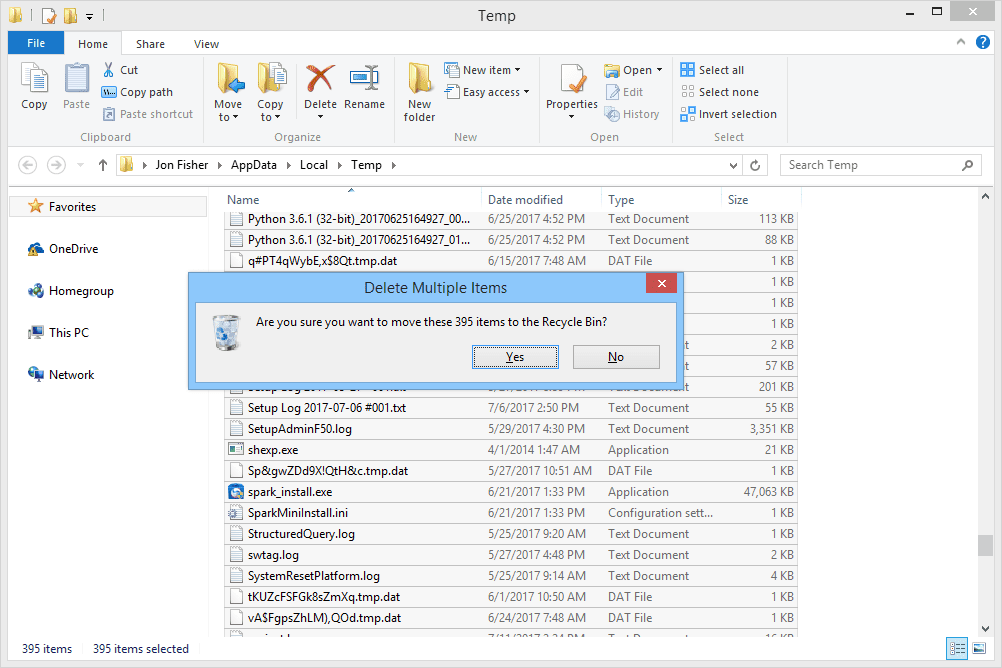
- Press Win+R shortcut to open the Run window, then type %temp% and tap OK to open the temporary files folder.
- Press Ctrl+A shortcut to select all folders then click the Delete key on your keyboard or the Delete button from the Home menu.
- If a window pops up to confirm your action, just click Yes.

Conclusion
The above are 8 common Windows 11/10 issues and solutions we have shared. Please click on our Bitwar official website for more articles on Windows. Meanwhile, welcome to contact our professional service to consult about our Bitwar Data Recovery Software.
Previous Article
How To Fix Windows 11/10 Recycle Bin Issues Summary: Windows Update is generally used to provide updates for bugs, derives and software, which makes our experience with computers...Next Article
Best Effective Solutions To Fix USB Flash Drive Not Formatted Error Summary: Windows Update is generally used to provide updates for bugs, derives and software, which makes our experience with computers...
About Bitwar Data Recovery
3 Steps to get back 500+ kinds of deleted, formatted or lost documents, photos, videos, audios, archive files from various data loss scenarios.
Learn More
 Follow the instructions and click Apply this fix when finding a solution.