6 Solutions to the Faulty Hardware Corrupted Page Error
Summary: BSOD, shorthand for Blue Screen of death, is definitely a nightmare for every computer user. Many of us have seen a blue screen of death when using Windows. Despite being a problem of seemingly identical appearance, these BSODs usually come with messages that are central to how to tackle error. One of these error messages you might see is the 결함이 있는 하드웨어 손상 페이지. 이 글에서는 원인을 알려드리겠습니다. 결함이 있는 하드웨어 손상 페이지 그리고 이에 대한 다양한 솔루션을 제시합니다. 그 외에도 사용법을 알려드리겠습니다. Bitwar 데이터 복구 손실된 데이터를 컴퓨터로 다시 가져옵니다.
Table of Contents
결함이 있는 하드웨어 손상 페이지 오류의 원인
결함이 있는 하드웨어 손상 페이지 오류가 무엇인지 더 잘 이해하려면 오류의 가능한 원인을 아는 것이 중요합니다. 아래에 몇 가지 원인을 나열했습니다.
- 프로그램을 잘못 제거하거나 설치했습니다.
- 시스템 파일 손상은 바이러스 공격 또는 맬웨어 공격으로 인한 것입니다.
- Windows 업데이트의 잘못된 설치.
- 오래된 드라이버.
- Windows 레지스트리 손상.
- 하드 디스크 손상.
결함이 있는 하드웨어 손상된 페이지 오류를 해결하는 방법
해결 방법 1: 드라이버 업데이트
The first solution we recommend you to try is to update drivers, not least the Display Drivers. You may well speed up the fixing process of the issue by prioritizing this solution if the problem occurs after a Windows 10 upgrade. Updating your drivers is pretty easy and takes only a few minutes.
Refer to the following steps:
Step 1: 눌러 윈도우 키 and R, 티응 개발MSC 그런 다음 누르십시오 입력하다.
Step 2: 더블 클릭 디스플레이 드라이버.
Step 3: 우클릭 디스플레이 장치 and then select 드라이버 소프트웨어를 업데이트합니다.
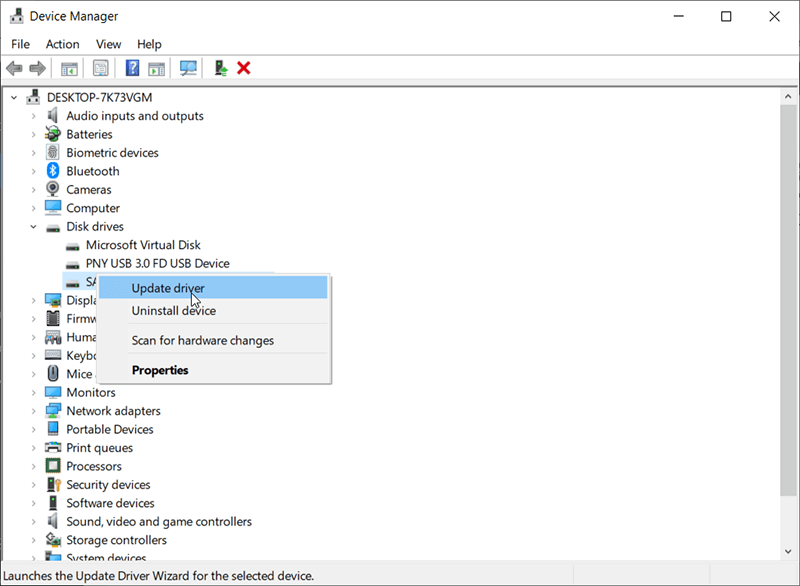
Step 4: 선택하다 업데이트된 드라이버 소프트웨어 자동 검색
Wait for your computer to search for an updated version of the device driver. If that works, the driver will be updated but when it doesn’t then you have to refer to the following steps:
Step 1: 로 돌아가 Device Manager 그런 다음 두 번 클릭하십시오. 디스플레이 장치.
Step 2: 로 전환 운전사 탭.
Step 3: 쓰다 드라이버 버전 이 탭에 표시됩니다.
Step 4: 제조사 홈페이지로 이동하여 디스플레이 장치 드라이버를 검색하고 최신 버전을 다운로드합니다.
Step 5: 돌아가기 Device Manager 창문.
Step 6: 마우스 오른쪽 버튼으로 클릭 디스플레이 장치그리고 선택드라이버 소프트웨어를 업데이트합니다.
Step 7: Click on 내 컴퓨터에서 드라이버 소프트웨어 찾아보기그리고 Browse.
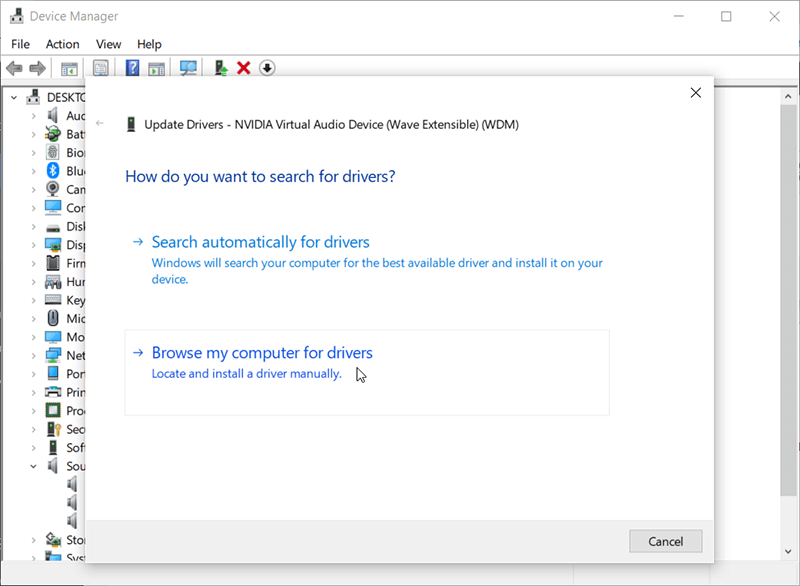
Step 8: 다운로드한 드라이버 버전을 저장한 폴더로 이동하여 선택합니다. 클릭 열려있는.
Step 9: Click on Next 그리고 나중의 지시를 따르십시오.
드라이버를 제거한 후 PC를 재부팅합니다. 시스템이 자동으로 새 드라이버를 설치합니다. 문제가 지속되는지 확인하십시오.
해결 방법 2: 빠른 시작 끄기
Turning off fast startup is another working solution that serves users well. The Fast Startup feature makes your computer boot quickly compared with a normal startup.
However, it may well trigger problems because of the lack of adequate time for your drivers and programs to be activated fully. Refer to the following steps to learn how to turn off this feature:
Step 1: 눌러 윈도우 키 + NS실행 상자를 엽니다.
Step 2: 입력 파워cfg.cpl 그런 다음 누르십시오 입력하다.
Step 3: 클릭 전원 버튼의 기능 선택 왼쪽 창의 옵션.
Step 4: Click on 현재 사용할 수 없는 설정 변경.
Step 5: 체크 해제 빠른 시작 켜기(권장)option.
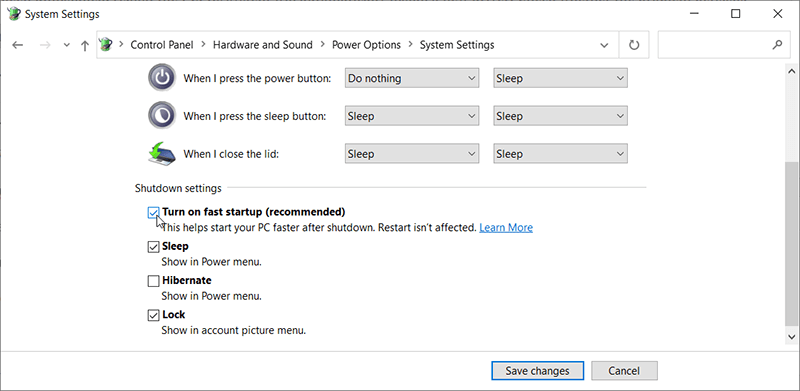
Step 6: Click on 변경 사항을 저장하다.
Step 7: PC를 재부팅하고 오류가 계속 발생하는지 확인합니다.
해결 방법 3: RAM 확인
일부 사용자는 RAM을 확인한 다음 청소 또는 교체하여 결함이 있는 하드웨어 손상 페이지 문제를 해결했다고 보고되었습니다. RAM에 결함이 있을 가능성이 높습니다. 따라서 RAM도 확인하는 것이 좋습니다.
The first step is to take out the RAM, clean it to ensure that there isn’t any dust sticking on the slots and then put the RAM back. After that, re-insert the RAM and then make sure it is properly connected.
Turn on the system and check whether the problem persists. Mercifully, the problem would be solved. But, if the problem still occurs, then get prepared to check the RAM conditions with the help of some memory test program.
Windows 메모리 진단
사용자는 메모리 확인을 위해 예약된 Windows 내장 메모리 진단 도구를 사용할 수 있습니다. 다른 메모리 테스트 프로그램에 비해 옵션이 제한적이지만 일반 RAM에 대한 충분한 진단 기능을 제공합니다. 따라서 타사 프로그램을 다운로드하지 않으려는 경우 특히 시도해 볼 가치가 있습니다.
Windows 메모리 진단 도구를 사용하는 방법을 배우려면 아래에 제공된 지침을 사용하십시오.
Step 1: 눌러 윈도우 키 + NS열다 운영 상자.
Step 2: 입력 mdsched그리고 누르다 입력하다.
단계 3: Click 지금 다시 시작하고 문제 확인(권장).
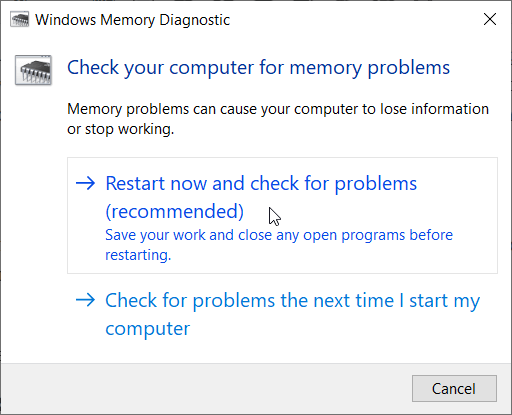
이 도구를 여는 일반적인 방법이 엉망이 되면 대신 다음 단계를 시도할 수 있습니다.
Step 1: Press 승리 + Q검색 표시줄을 엽니다.
Step 2: 입력 메모리 진단 도구.
Step 3: 우클릭 Windows 메모리 진단 그리고 클릭 관리자 권한으로 실행.
Step 4: Click on 지금 다시 시작하고 문제 확인(권장).
Windows가 자동으로 재부팅되고 테스트가 시작됩니다. 테스트 과정을 볼 수 있습니다. 테스트가 끝나면 컴퓨터가 다시 재부팅됩니다. 그런 다음 다음 테스트 결과에 따라 RAM을 변경해야 하는지 여부를 결정할 수 있습니다.
수동 테스트
Since the testing process may well take a lot of time, you can try to fix the problem if you have a spare RAM. You can replace the supposedly faulty RAM with the spare RAM to check if your computer still triggers the error.
Make sure that the spare RAM is in working condition and is compatible with the PC. If replacing your RAM fix the BSOD problem then the previous RAM is most likely the cause behind the issue.
해결 방법 4: SFC 실행
이전에 언급했듯이 시스템 파일 손상은 결함이 있는 하드웨어 손상 페이지 오류의 원인일 수도 있습니다. 이 경우 시스템 파일 검사기를 실행해 볼 수 있습니다.
Step 1: 누르다 윈도우 + X and then select Command Prompt (Admin) 메뉴에서.
Step 2: 명령 프롬프트에서 다음 명령을 입력하고 Enter 키를 누릅니다.
sfc /scannow
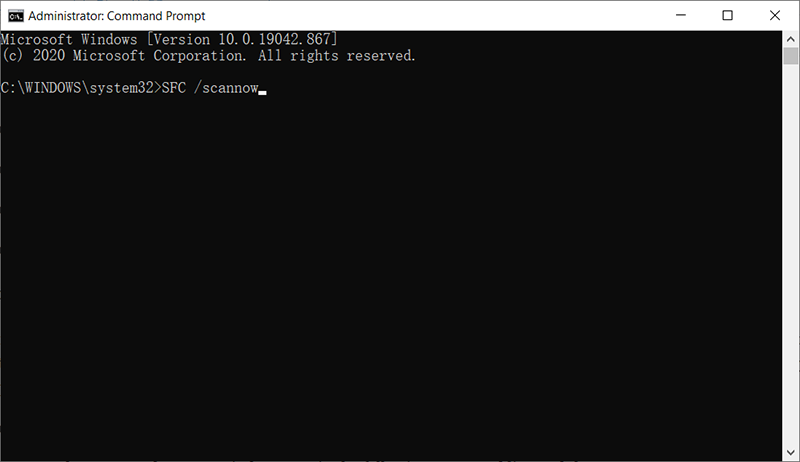
Step 3: 스캔 프로세스가 완료될 때까지 기다립니다.
Step 4: 이 솔루션이 트릭을 수행하는지 확인하려면 컴퓨터를 재부팅하십시오.
How to Recover Lost Files Using Bitwar Data Recovery
The faulty hardware corrupted page error may well result in tricky data loss issues, Fortunately, files lost in this way can be recovered using our secure and reliable data recovery tool, Bitwar 데이터 복구.
Follow the steps below to recover your lost files!
Step 1: Download Bitwar 데이터 복구 from Official Download Center그리고 PC에 설치합니다.
Step 2: 복구 도구를 시작한 다음 손실된 파일이 있던 드라이브를 선택한 다음 Next버튼을 눌러 진행합니다.
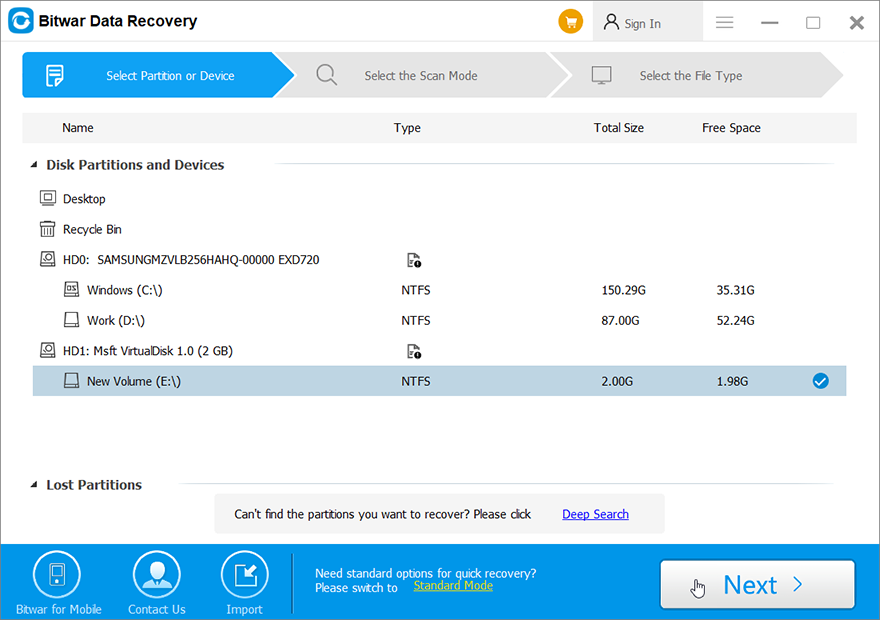
Step 3: 스캔 모드를 선택할 수 있습니다. 초보자에게 권장합니다. Quick Scan, 정상적인 수의 손실된 파일을 복구할 수 있습니다. 그것이 당신에게 잘 봉사하지 않는다면, 당신은 사용할 수 있습니다면밀히 살펴보다다음번.
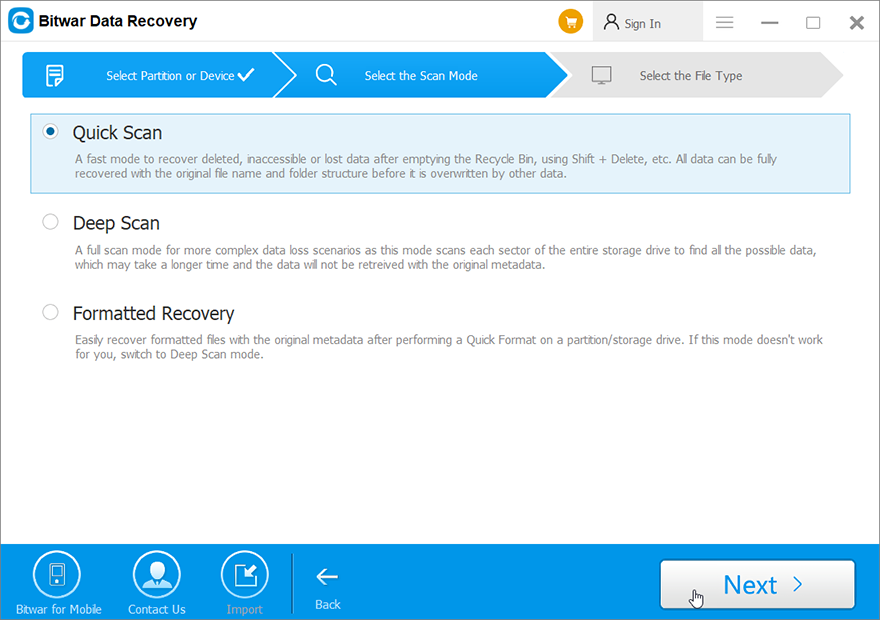
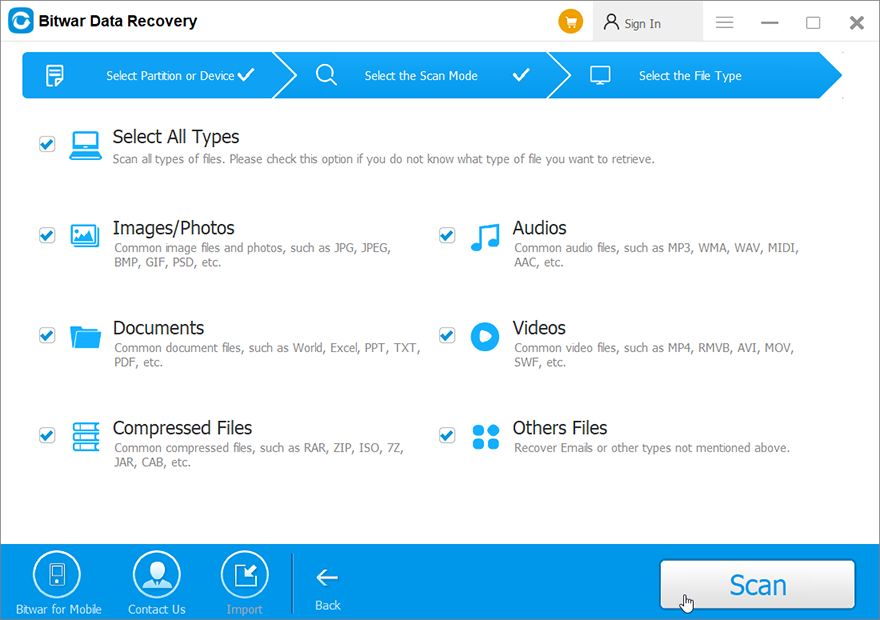
Step 4: Click Next, 검색하려는 파일 형식을 선택한 다음Next button.
Step 5: Preview원하는 모든 파일.
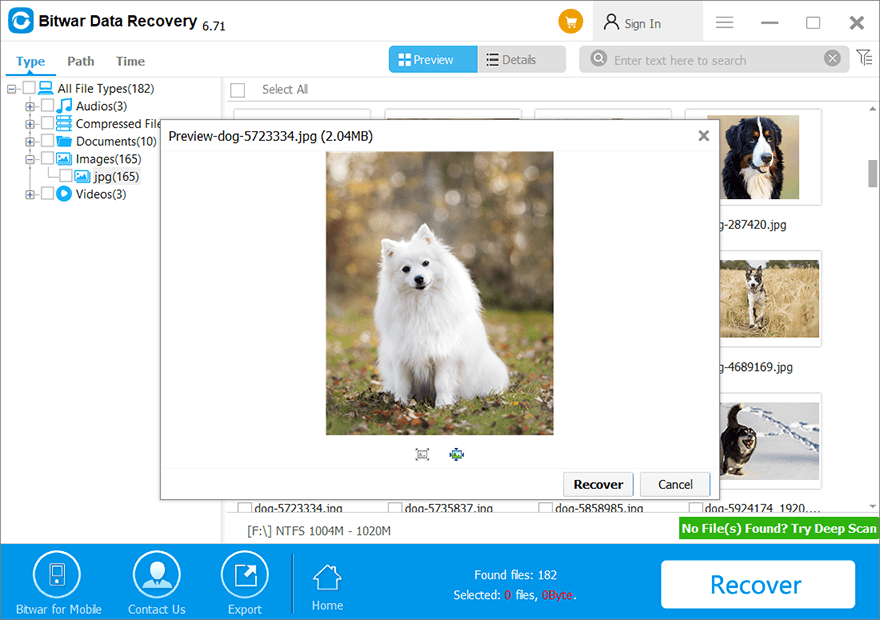
Step 6: 마지막으로 원하는 파일을 미리 보고 선택한 후Recover버튼을 눌러 복구 프로세스를 시작합니다.
고급 솔루션
해결 방법 1: 운영 체제 재설정
If all the aforementioned solutions go haywire, there are two options left, one of which is resetting your operating system. But bear in mind that before using this solution, users had better back-up important data and files.
Refer to the following steps to learn how to use this solution:
Step 1: 누르다 승리 + 나 열기 위해 Settings and then select 업데이트 및 보안.
Step 2: 클릭 Recovery 왼쪽 패널에서
Step 3: 클릭 시작하다 아래에 이 PC 초기화 제목을 클릭하고 모두 제거.
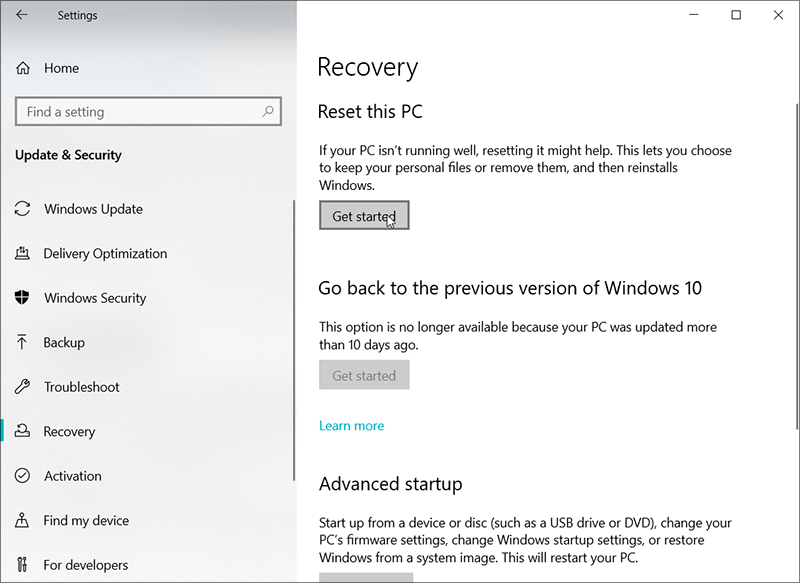
Step 4: 클릭 초기화 button.
Step 5: 재설정이 완료되면 컴퓨터가 자동으로 Windows를 설치합니다.
해결 방법 2: 시스템 복원 실행
또 다른 효과적인 솔루션은 시스템 복원입니다. 컴퓨터에 복원 지점이 있는 경우에만 시스템 복원을 실행할 수 있습니다. 문제가 발생하기 전 시점으로 시스템 복원을 실행하는 것이 가장 좋습니다.
Step 1: 눌러 윈도우 키 + Q, 입력복원 지점 만들기 그런 다음 엽니다.
Step 2: 클릭 시스템 복원 옵션을 클릭한 다음 Next.
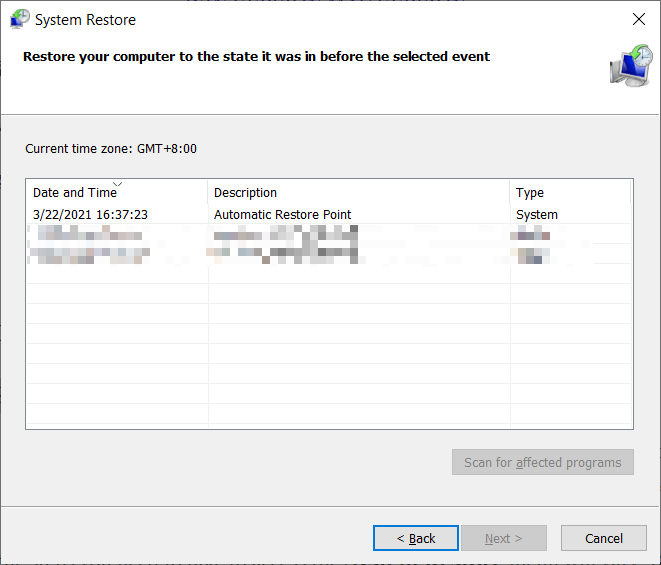
Step 3: 복원 지점을 선택합니다.
Step 4: Click Next선택한 상태로 되돌립니다.
Step 1: 입력복원 지점 만들기 에서찾다술집.
Step 2: 시스템 드라이브의 보호 상태가 다음인지 확인하십시오. 에.
Step 3: 상태가 꺼져 있으면 디스크를 선택한 다음 구성.
Step 4: 새 창에서 시스템 보호 켜기 그리고 클릭 OK 변경 사항을 확인합니다.
Conclusion
In this article, we delineate how to tackle the faulty hardware corrupted page error, which usually occurs in three common scenarios. To help users facing this error that may be triggered by various causes, we have listed several working solutions for each case. Along with solutions, for users who also run into a data loss issue, we have also introduced a powerful and reliable data recovery tool Bitwar 데이터 복구, to help you retrieve lost files.
Previous Article
How to Fix the WHEA_UNCORRECTABLE_ERROR Summary: BSOD, shorthand for Blue Screen of death, is definitely a nightmare for every computer user. Many of us have...Next Article
[Solved] BSOD Error Machine Check Exception Summary: BSOD, shorthand for Blue Screen of death, is definitely a nightmare for every computer user. Many of us have...
About Bitwar Data Recovery
3 Steps to get back 500+ kinds of deleted, formatted or lost documents, photos, videos, audios, archive files from various data loss scenarios.
Learn More
