[해결됨] 컴퓨터가 예기치 않게 다시 시작됨
Summary: Virtually every user would like to update their computers to the latest most improved version of the Windows system. No matter how great a version of Windows is, it may still face challenges just like other versions. The computer restarted unexpectedly error is a problem that keeps hassling users. If you are running into it and hankering for a reliable solution to it, you have come to the right place. In this article, we will explain to you how to grapple with the computer restarted unexpectedly error. On top of it, if you run into any data loss problems triggered by this error, you can also refer to this article to learn how to use Bitwar 데이터 복구 손실된 파일을 다시 가져옵니다.
Table of Contents
컴퓨터가 예기치 않게 다시 시작되는 오류를 수정하는 방법
방법 1: Windows 레지스트리를 편집하여 Setup.exe 값 변경
Windows 레지스트리 편집기를 통해 setup.exe의 값을 변경합니다. 다음 단계를 사용하십시오.
Step 1: 컴퓨터가 예기치 않게 다시 시작되었다는 오류 팝업이 나타나면 Win + R to open the Run box.
Step 2: Type in Regedit and then press Enter to open it.
Step 3: 사용자 계정 컨트롤 창이 나타나면 Yes.
Step 4: 새 창에서 다음으로 이동합니다.
HKEY_LOCAL_MACHINE\SYSTEM\Setup\Status\Child\Completion
Step 5: 오른쪽 창에서 setup.exe 키를 두 번 클릭합니다.
Step 6: 값 데이터의 값을 1에서 3으로 변경하십시오. 확인을 클릭하여 변경 사항을 저장하십시오.
Step 7: 이 창을 닫고 PC를 다시 시작하십시오.
방법 2: 모든 USB 장치 분리
If you have connected several different USB devices to your computer, then this could be your problem. The reason is that the devices may be interfering with your computer’s functions, therefore resulting in the computer being restarted unexpectedly issue. So, check your computer to see if you have connected several USB devices to your computer such as printers, flash drives, etc. Disconnect all these accessories, including your mouse and keyboard.
컴퓨터를 다시 시작하여 이 오류가 수정되었는지 확인하십시오.
방법 3: 하드 드라이브 드라이브 확인
There is a chance that this computer restarting unexpected error is caused by your computer’s hard drives. Therefore, you can try checking your hard drive cables to see if there are any physical problems with them. If there is, disconnect the malfunctioning drive.
또한 물리적 문제가 보이지 않지만 해당 드라이브가 정상적으로 작동하는지 확실하지 않은 경우 마더보드를 다른 하드 드라이브와 연결하는 케이블을 변경할 수 있습니다. 많은 사용자가 이것을 시도했고 효과가 있었기 때문에 이 솔루션도 작동할 수 있습니다.
다시 한 번, 컴퓨터 케이스를 열면 보증이 무효화된다는 점을 명심하십시오. 따라서 컴퓨터가 아직 보증 기간 내에 있는 경우 공식 수리 센터를 방문하여 도움을 요청할 수 있습니다.
방법 4: 운영 체제 재설정
이 방법은 시스템의 오류를 해결하기 위해 Windows OS를 재설정합니다. 재설정 프로세스 중에 파일을 유지할지 삭제할지 선택할 수 있습니다. 두 가지 옵션을 모두 사용할 수 있습니다. 방법을 배우려면 다음 단계를 참조하십시오.
Step 1: Win + I를 눌러 열기 Settings.
Step 2: Select Update & Security.
Step 3: Select the Recovery button.
Step 4: 라고 표시된 섹션으로 이동합니다. Reset this PC and click on Get Started.
Step 5: 모든 파일을 유지하려면 Keep my files 옵션을 선택한 다음 Next.
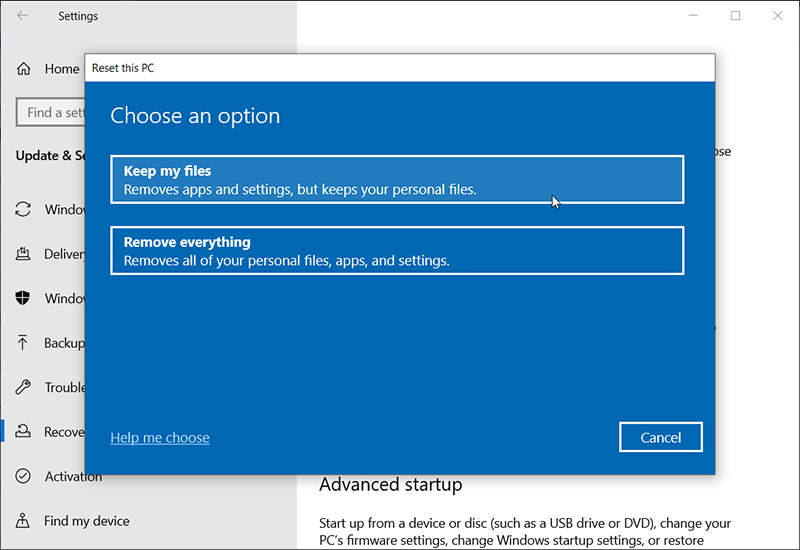
Step 6: 한편, 이 재설정으로 인해 제거될 프로그램을 보려면 제거할 앱 목록 옵션을 클릭하십시오.
Note: 컴퓨터가 운영 체제를 재설정하면 설치한 모든 타사 앱이 제거되고 시스템 파일과 앱만 제거된 상태로 유지됩니다. 따라서 재설정 후 다시 설치해야 하는 모든 앱을 기록해 두는 것이 좋습니다.
Step 7: 반면에 시스템의 모든 것을 삭제하려면 두 번째 옵션을 선택하십시오. 옵션을 선택하세요 창을 클릭한 다음 모두 제거.
Step 8: 이 재설정으로 인해 영향을 받을 드라이브를 확인하여 재설정해도 원하는 파일이 삭제되지 않는지 확인할 수도 있습니다. 당신은 단순히 선택하여 그렇게 할 수 있습니다 영향을 받을 드라이브 목록 표시 option.
Step 9: 이전 창으로 돌아가려면 선택합니다. 그런 다음 다음 단계로 넘어갑니다.
10단계: 마지막으로 재설정 버튼을 선택하여 프로세스를 완료합니다.
11단계: 재설정이 완료되면 컴퓨터를 재부팅하고 오류가 수정되었는지 확인하십시오.
방법 5: 자동/시동 복구 실행
다음 단계를 사용하여 문제를 자동으로 복구하고 수정하도록 Windows를 설정하여 오류를 수정할 수도 있습니다.
Step 1: 부팅 가능한 미디어를 컴퓨터에 삽입한 다음 키보드의 아무 키나 눌러 계속합니다.
Step 2: 컴퓨터 복구 옵션을 선택합니다.
Step 3: 설치를 위해 다음 창으로 이동하는 대신 다음을 클릭하십시오. Troubleshoot.
4단계: C핥아 Advanced option.
Step 5: 둘 중 하나를 선택 Startup Repair or Automatic Repair.
방법 6: BIOS 업데이트
BIOS (Basic Input Output System) is critical in the process of your computer booting. If it is out of date, the computer may see the error of the computer restarting unexpectedly even while the user is still using it. Thus, in this case, you need to update your BIOS.
그러나 PC의 BIOS를 업데이트하는 과정은 쉽지 않으므로 어떻게 진행할 것인지 주의해야 합니다. 이는 컴퓨터가 BIOS를 업데이트하는 동안 PC를 위험에 빠뜨리거나 마더보드에 영구적인 손상을 줄 수 있기 때문입니다.
새 버전의 BIOS를 다운로드하려면 현재 제대로 작동하지 않는 다른 컴퓨터가 필요합니다. 작동 중인 컴퓨터에 다운로드한 후 USB 드라이브로 복사하거나 이동합니다. 명령 프롬프트를 실행하고 거기에서 BIOS 업데이트를 수행하십시오. 마더보드 설명서에는 BIOS 업데이트 방법에 대한 자세한 지침이 포함되어 있어야 합니다. 지침에 따라 업데이트를 수행하십시오.
업데이트가 완료된 후 문제가 해결되었는지 확인하십시오.
방법 7: Windows 복구 드라이브 사용
Windows 복구 드라이브를 사용하면 다시 설치할 필요 없이 PC의 원래 상태를 복원할 수 있습니다. 복구 드라이브는 PC를 유지 관리하면서 공장 설정으로 복원하는 데 도움이 되기 때문에 이 시나리오에서 매우 유용하게 사용할 수 있는 기능입니다.
일부 PC에는 자체 하드 드라이브에 복구 드라이브가 있지만 그렇지 않은 PC도 있습니다. 컴퓨터에 컴퓨터가 없으면 Windows 시스템이 작동하는 다른 컴퓨터에서 만들 수 있습니다. 이렇게 하려면 아래 단계를 따르세요.
Step 1: 최소 8GB 저장 용량의 USB 드라이브를 구입하세요. 안전을 위해 16GB USB 드라이브를 사용하는 것이 좋습니다. 때로는 8GB의 저장 용량도 충분하지 않기 때문입니다.
Step 2: 드라이브를 컴퓨터에 연결합니다.
Step 3: Press Win + Q to open the search bar, type in 복구 드라이브 만들기.
Step 4: 복구 드라이브 만들기 도구를 클릭합니다.
Step 5: USB 드라이브에 복구 드라이브를 생성하기로 결정합니다.
Step 6: 생성 중인 복구 드라이브에 시스템 파일을 백업하기로 결정한 다음 Next.
Step 7: 준비한 USB 드라이브를 선택하고 다시 한 번 클릭하십시오. Next button.
Step 8: 클릭 후 Create, 복구 드라이브 생성 프로세스가 시작됩니다.
복구 USB 드라이브를 생성했으므로 이제 사용할 차례입니다. 다음 단계를 사용하십시오.
Step 1: 문제로 황폐해진 컴퓨터에 USB 드라이브를 연결합니다.
Step 2: Go to the 고급 부팅 부팅 단계를 수행할 때 PC를 여러 번 다시 시작하여 화면을 표시합니다.
Step 3: 문제 해결을 클릭합니다。
Step 4: 로 이동 고급 옵션 > 시스템 이미지 복구.
Step 5: 화면의 지시에 따라 PC를 복원하십시오.
동일한 Windows 버전을 사용하더라도 다른 PC에서 생성된 복구 드라이브가 귀하의 컴퓨터에서 작동하지 않을 수 있음을 염두에 두는 것이 중요합니다. 따라서 문제가 발생하기 전에 PC가 완벽한 작동 상태일 때 항상 복구 드라이브를 사용하는 것이 좋습니다.
방법 8: Windows 새로 설치 수행
마지막으로 새로 Windows 설치를 수행하도록 선택할 수 있습니다. 지금까지 문제를 파악하지 못했다면 이것은 모든 파일, 폴더 및 컴퓨터 설정을 지우는 방법입니다. 따라서 원하는 데이터가 있는 경우 새로 설치를 수행하기 전에 백업해야 합니다.
Step 1: 온라인 도구를 사용하여 USB 부팅 가능한 드라이브를 만듭니다.
Step 2: BIOS 설정을 통해 부팅 순서를 변경한 다음 부팅 가능한 드라이브를 PC에 삽입하여 PC가 드라이브에서 시작할 수 있도록 합니다.
Step 3: 선택한 후 화면에 표시되는 지침에 따라 새로 설치를 수행합니다. Install Now.
컴퓨터가 예기치 않게 다시 시작되어 저장되지 않은 파일을 복구하는 방법
If your PC restarted while you were still working on some documents, there is a chance that you might lose important files in light of the computer restarted unexpected issue. If this is your case, you could rely on our recovery tool after fixing the error. With this tool, you can recover files in whatever format they are: audio files, documents, zipped, video, images, etc.
Bitwar Data Recovery는 저장되지 않은 파일을 손상되지 않은 상태로 복구할 수 있는 타사 소프트웨어입니다. 우리가 논의한 것과 같은 시스템 오류, 메모리 카드 오류, 시스템 충돌, 바이러스 공격, 하드 드라이브 오류 등으로 인해 손실된 파일을 복구할 수 있습니다. 이 프로그램은 사용하기 매우 쉽기 때문에 초보자도 어려움 없이 인터페이스를 탐색할 수 있습니다. 작동 방식을 알아보려면 다음 단계를 따르세요.
Step 1: Download Bitwar Data Recovery from our official website and install it.
Step 2: Open the program, choose the disk drive where those missing files were stored, and then click Next.
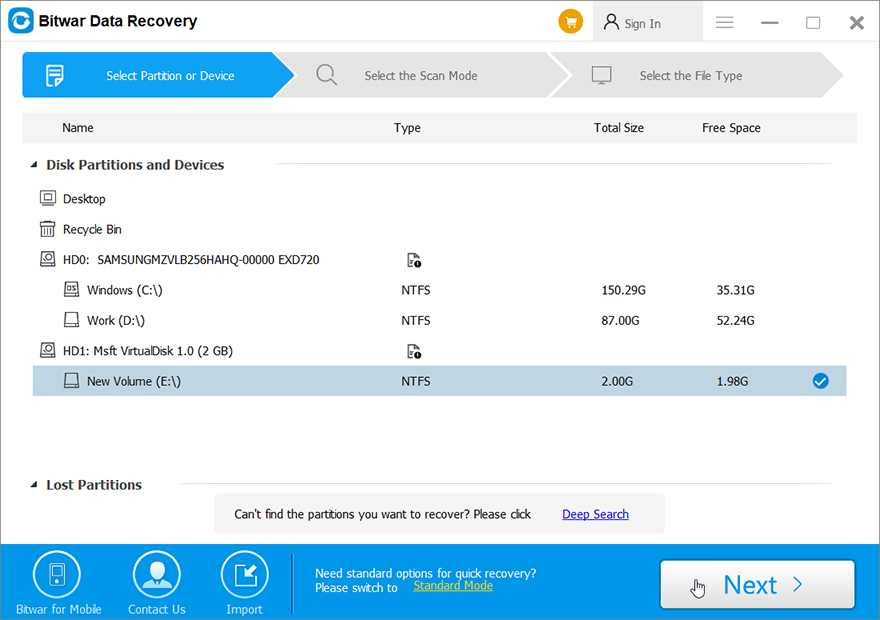
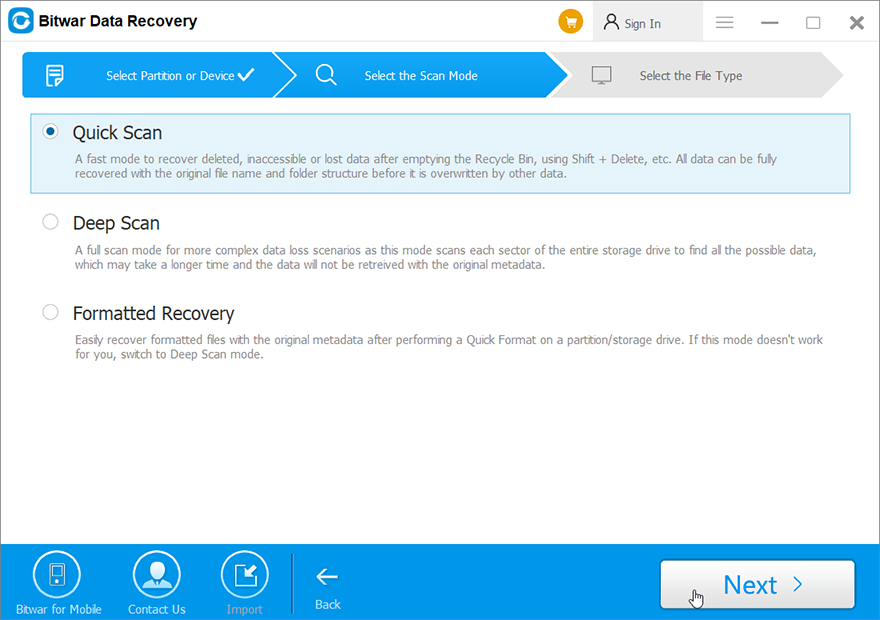
Step 3: You could select a scan mode in this stage. We would like to recommend Quick Scan, which is able to retrieve a great number of lost files. If it fails you, you can re-run the tool again and choose Deep scan, which is more effective.
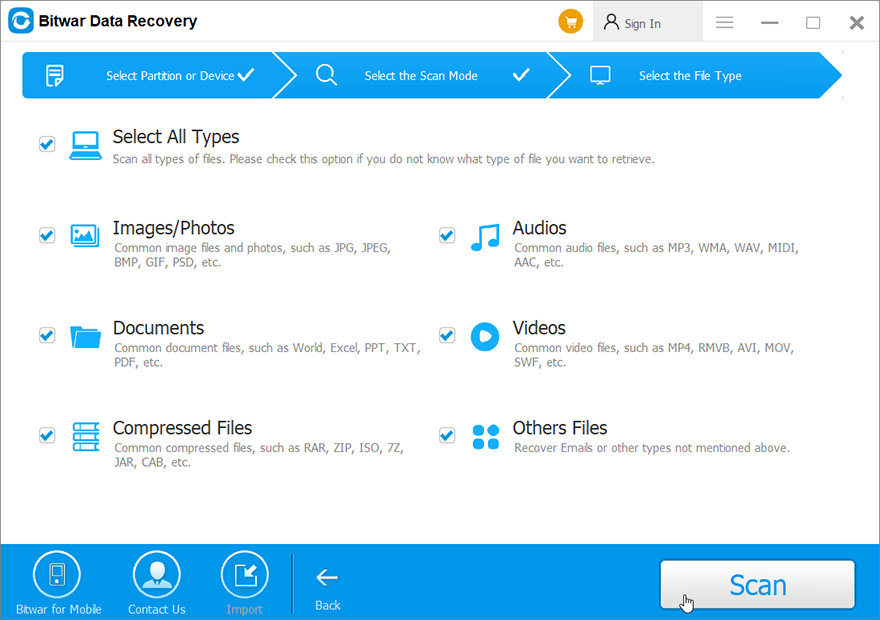
Step 4: Choose the types of files you want to bring back and click Scan.
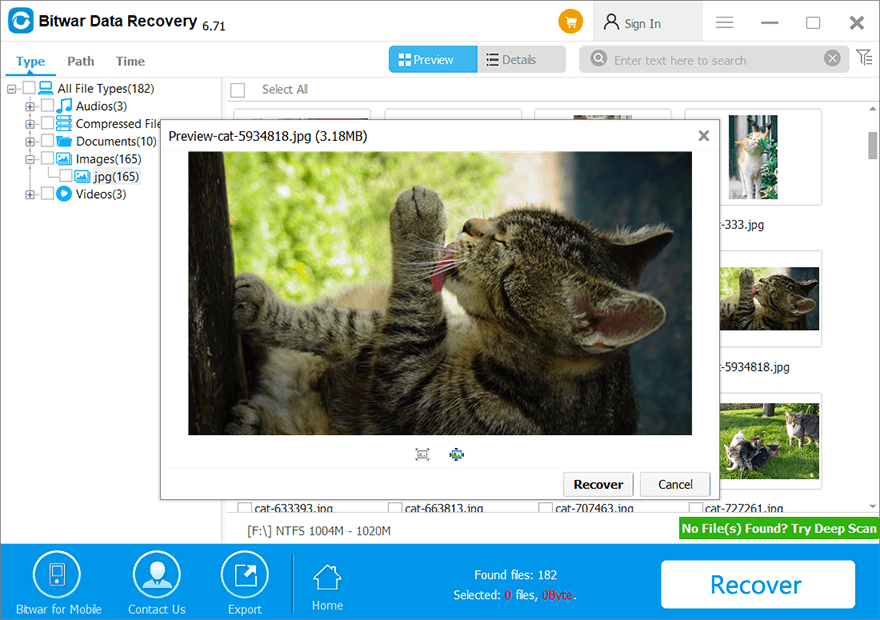
Step 5: Preview files you want to check their intactness. Choose those intact files and click Recover.
Conclusion
How to fix the computer restarted unexpectedly error? In this article, we have offered multiple effective methods for you. Thus, if you meet the error message saying that The computer restarted unexpectedly. Try the methods mentioned above. Besides, it is wise to back up your system when your computer runs in a perfect state so that you can easily restore your system after your computer has crashed. And if you run into any data loss issues when fixing the computer restarted unexpectedly error, bear in mind that you can always turn to Bitwar 데이터 복구 for help.
Previous Article
자동 복구로 PC 오류를 복구할 수 없는 문제를 해결하는 방법 요약: 거의 모든 사용자는 컴퓨터를 최신 버전의 Windows 시스템으로 업데이트하고 싶어합니다....
About Bitwar Data Recovery
3 Steps to get back 500+ kinds of deleted, formatted or lost documents, photos, videos, audios, archive files from various data loss scenarios.
Learn More
