Solutions efficaces à l'erreur kernel_security_check_failure
Résumé: De nombreux utilisateurs de Windows sont habitués à un problème où leur ordinateur s'éteint de manière aléatoire, affichant une erreur BSOD (Blue Screen of Death) avec un code : KERNEL_SECURITY_CHECK_FAILURE. Lorsqu'une erreur BSOD survient, de nombreux fichiers centraux sur votre ordinateur ne restent plus les mêmes. Aucun utilisateur n'aime être interrompu lorsqu'il travaille sur une mission très importante à livrer dans un délai pressant. Pour vous aider à résoudre ce problème particulier de BSOD, nous vous proposerons plusieurs solutions. En outre, si vous rencontrez un problème de perte de données accompagnant ce problème, vous pouvez toujours vous tourner vers Récupération de données bitwar for help.
Table des matières
Quelles sont les causes de KERNEL_SECURITY_CHECK_FAILURE ?
L'erreur de KERNEL_SECURITY_CHECK_FAILURE peut se produire en raison de :
- Pilotes obsolètes
- Attaques de virus
- Disques durs corrompus ou endommagés
- Problèmes de mémoire
- système Windows corrompu
Les erreurs BSOD entraînent non seulement une perte de progression et de données mais, dans ce cas, empêchent également un utilisateur affecté d'utiliser des programmes défectueux. D'un autre côté, l'erreur KERNEL_SECURITY_CHECK_FAILURE, comme beaucoup d'erreurs BSOD, est complètement réparable. mais il n'y a pas une cause universelle derrière ce problème, il y a pas mal de choses différentes qui peuvent provoquer ce problème, comme nous l'avons mentionné ci-dessus. Par conséquent, vous pouvez vous référer aux solutions suivantes pour essayer de résoudre ce problème :
Comment résoudre l'erreur de KERNEL_SECURITY_CHECK_FAILURE ?
Solution 1 : modifier le processeur graphique par défaut
In most cases, the malfunctioning computer has two graphics cards. the cause of this problem is that some programs the affected user tries to launch immediately before they run into this error are trying to use the integrated graphics processor instead of the more powerful NVIDIA GPU. If that is the case, you can solve this error by simply changing the default graphics processor for any and all applications. Hence, only users with computers that have both an Intel HD graphics processor and an NVIDIA GPU can use this solution. Refer to the following steps to learn how it works:
Step 1: Faites un clic droit sur le raccourci vers le programme qui déclenche l'erreur de KERNEL_SECURITY_CHECK_FAILURE.
Step 2: Click on Exécuter avec un processeur graphique dans le menu déroulant.
Step 3: Click on the Changer le processeur graphique par défaut option.
Step 4: Le panneau de configuration NVIDIA apparaîtra dans la section de droite et sélectionnera l'application défaillante.
Step 5: Affichez le menu déroulant sous Sélectionnez le processeur graphique préféré pour ce programme.
Step 6: Click on the Processeur NVIDIA hautes performances dans le menu déroulant pour le sélectionner.
Step 7: Click Apply pour enregistrer les modifications que vous avez apportées.
Step 8: Redémarrage ton ordinateur.
Une fois que votre ordinateur a démarré, lancez l'application défaillante pour laquelle vous venez de changer le processeur graphique par défaut et vérifiez s'il fonctionne correctement. Si vous voyez à nouveau l'erreur KERNEL_SECURITY_CHECK_FAILURE, essayez l'une des autres solutions répertoriées et décrites.
Si cette erreur affecte plusieurs programmes sur votre ordinateur, vous devez répéter le processus décrit ci-dessus pour chacun de ces programmes.
Solution 2 : mettez à jour le pilote de votre GPU NVIDIA
L'une des autres causes de ce problème lié à GUP est un bogue dans la version du logiciel pilote de votre GPU NVIDIA qui a été installée sur votre PC. De nombreuses versions de logiciels pilotes publiés pour les GPU NVIDIA ont hébergé ce bogue, et ce bogue a, à son tour, ravagé l'ordinateur. S'il s'avère que ce problème est causé par une version spécifique du pilote de votre GPU NVIDIA que votre ordinateur possède, le moyen le plus simple de le résoudre devrait être de mettre à jour le logiciel du pilote du GPU vers la dernière version. Pour ce faire, procédez comme suit :
Step 1: Navigate to the Site Web de NVIDIA GeForce à l'aide d'un navigateur.
Step 2: Click on Conducteurs.
Step 3: Dans le Recherche de pilote manuellesection, choisissez le type de GPU NVIDIA que vous possédez, sa série et son numéro de modèle exact, le système d'exploitation et votre langue préférée, puis cliquez sur Lancer la recherche.
Step 4: La recherche affichera les quatre pilotes les plus récemment publiés pour votre GPU NVIDIA. Cliquez sur l'un d'eux.
Step 5: Click Accepter et télécharger.
Step 6: Téléchargez le programme d'installation du pilote.
Step 7: Une fois le programme d'installation du pilote téléchargé, lancez-le et suivez les instructions qu'il affiche pour installer la dernière version du logiciel pilote de votre GPU NVIDIA. Pendant l'installation, le programme d'installation désinstallera l'ancien pilote sur votre ordinateur et installera le dernier.
Step 8: Une fois la mise à niveau réussie, vérifiez si le problème a été résolu.
Solution 3 : restaurer le pilote
Dans certains cas, la version spécifique du pilote d'un périphérique peut être en cause, la solution consiste donc à restaurer le pilote vers une version plus ancienne. L'avantage des anciennes versions des pilotes est qu'elles sont assez stables. Si Solution 2 ne fonctionne pas car aucune mise à jour n'était disponible pour le pilote de votre GPU NVIDIA, vous pouvez essayer de résoudre ce problème en revenant à une version plus ancienne mais plus stable du pilote de votre GPU NVIDIA. Si vous souhaitez résoudre ce problème en revenant à une ancienne version du pilote du GPU NVIDIA, procédez comme suit :
Step 1: Right-click on the Le menu Démarrerbouton puis sélectionnez Device Manager.
Step 2: Double-cliquez sur lePrises d'écranarbre pour l'agrandir.
Step 3: Faites un clic droit sur votre pilote GPU NVIDIA.
Step 4: Cliquer surProperties sur le menu déroulant menu qui s'affiche.
Step 5: Basculez vers le Conducteurtab.
Step 6: Cliquer surRetour en arriere.
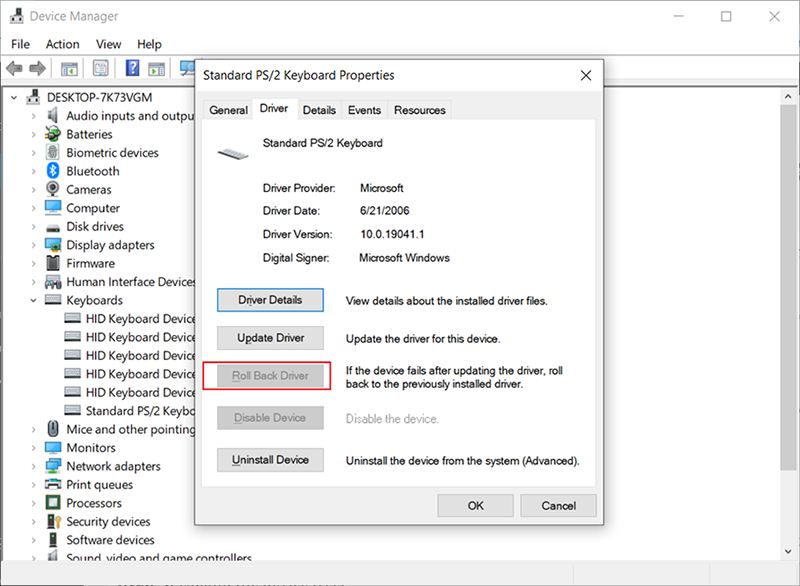
Step 7: Cliquer surYes.
Suivez les instructions à l'écran pour restaurer le pilote de votre GPU NVIDIA à la version précédemment installée sur votre PC.
Solution 4 : supprimez le fichier sniffer.exe
Pour les utilisateurs confrontés à ce problème qui l'ont notamment rencontré lors du lancement de Photoshop, ils peuvent essayer de résoudre ce problème en supprimant un fichier nommé sniffer.exe(ou sniffer_gpu.exe) à partir du répertoire où Photoshop est stocké. Pour ce faire, procédez comme suit :
Step 1: Press the Windows + E pour lancer leFile Explorer.
Step 2: Accédez au répertoire suivant :
Step 3: Localisez un fichier nomméEXE. Le fichier peut également, dans certains cas, être nommésniffer_gpu.exe.
Step 4: Déplacez ce fichier vers votreDesktop.
Étape 5 : Redémarrerton ordinateur.
Step 6: Une fois que votre ordinateur a démarré, essayez de lancer Photoshop. Si Photoshop s'exécute correctement et que l'erreur KERNEL_SECURITY_CHECK_FAILURE ne s'affiche pas, supprimez le sniffer.exe(ou sniffer_gpu.exe) fichier de votre Desktop.
How to Recover Lost Files Using Bitwar Data Recovery
L'erreur KERNEL_SECURITY_CHECK_FAILURE peut provoquer un écran bleu, ce qui peut entraîner ultérieurement une perte de données sur votre PC. Imaginez un scénario lorsque vous travaillez sur un fichier de travail critique et que votre PC affiche soudainement une erreur BSOD, déclenchée par le KERNEL_SECURITY_CHECK_FAILURE. Le fichier sur lequel vous travailliez sera perdu et vous devrez à nouveau travailler sur un nouveau fichier. Cela peut être un inconvénient grave. Heureusement, un outil de récupération de données comme Bitwar Data Recovery peut vous aider à récupérer les fichiers perdus. Il analysera votre ordinateur pour rechercher les fichiers perdus et supprimés, puis les récupérera. Référez-vous aux étapes suivantes pour savoir comment cela fonctionne.
Step 1: Allez sur notre site officiel, téléchargez Bitwar Data Recovery puis installez-le sur votre PC.
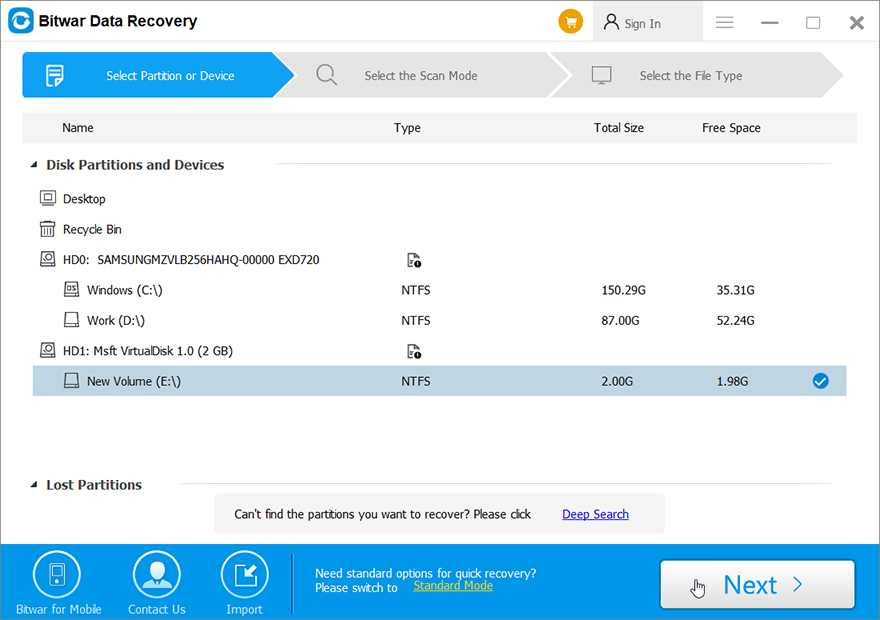
Step 2: Ouvrez l'outil, choisissez le lecteur de disque où vos fichiers perdus ont été stockés, puis cliquez sur Suivant.
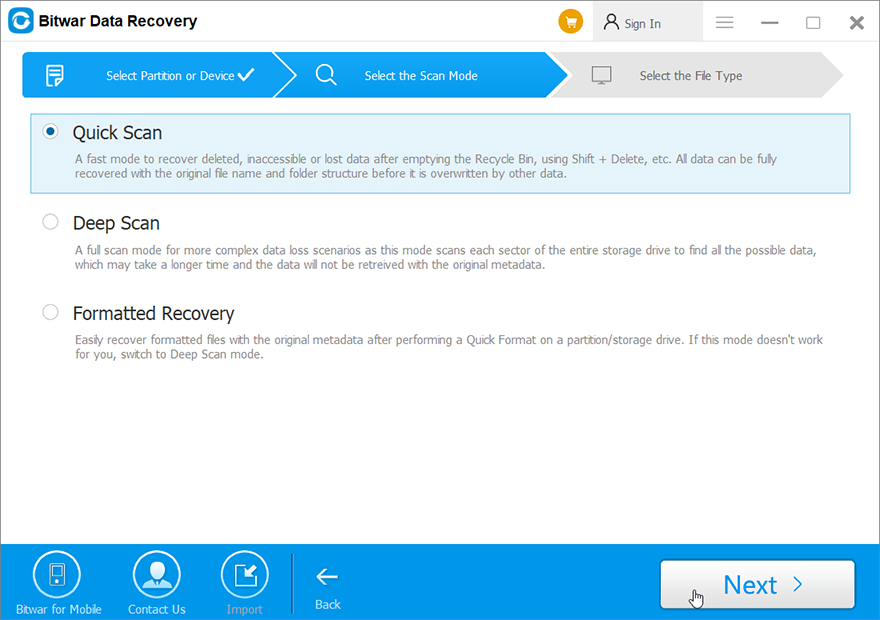
Step 3: Vous pouvez sélectionner un mode de balayage à cette étape. Nous aimerions recommander Quick Scan, qui peut récupérer un nombre sain de fichiers perdus. S'il échoue, vous pouvez relancer le programme et choisir Deep scan, which is more effective.
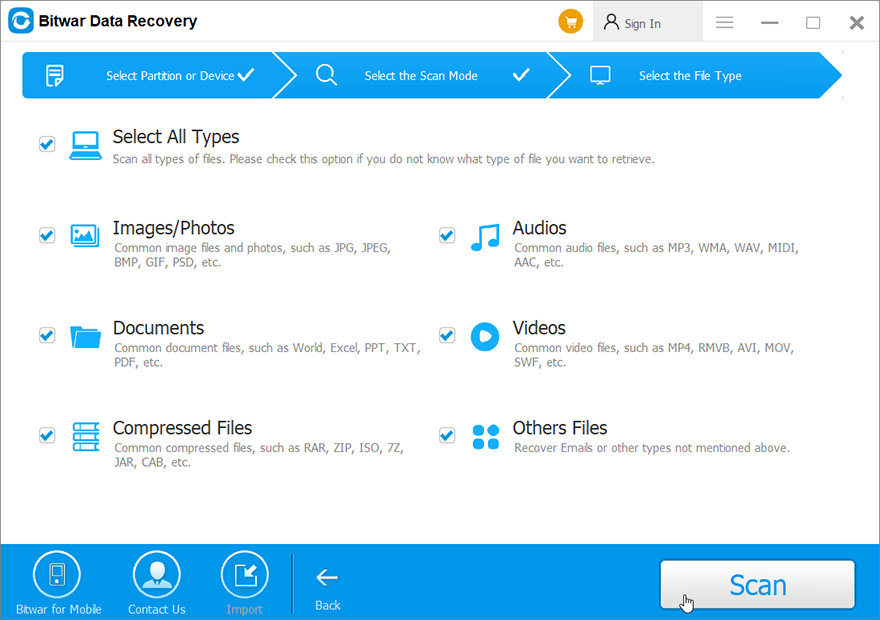
Step 4: Sélectionnez les types de fichiers que vous souhaitez ramener et cliquez sur Scan.
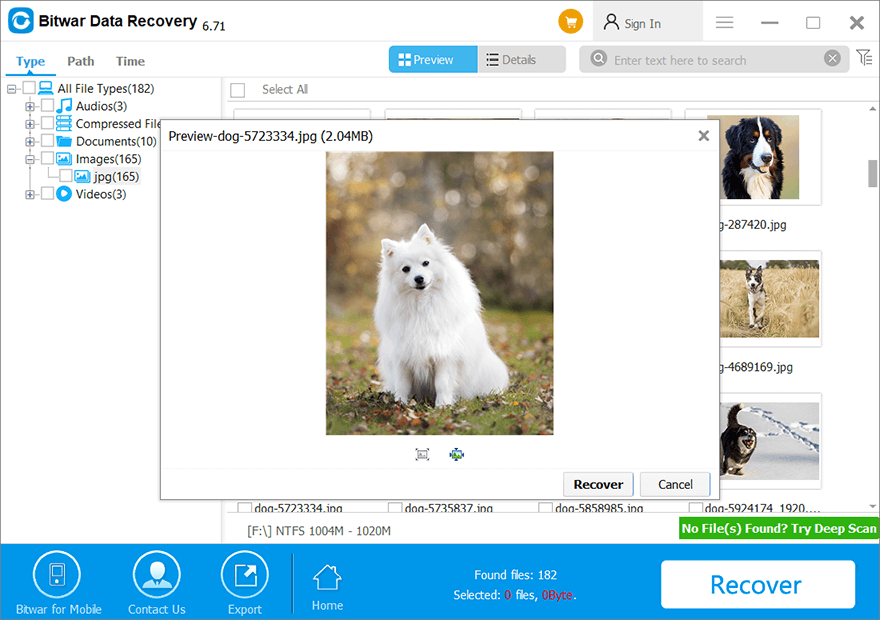
Step 5: Preview fichiers souhaités et voir leur intégrité. Sélectionnez ces fichiers intacts, puis cliquez sur Recover.
Conclusion
KERNEL_SECURITY_CHECK_FAILURE is a common BSOD error that can lead to serious consequences. It can afflict the health of your device and may well trigger the loss of your valued data. The article above discusses the causes of the error and several solutions to it. To recover the lost data due to the error, you can choose an effective and user-friendly data recovery program like Récupération de données bitwar.
Article précédent
Comment corriger l'erreur Ces éléments sont trop gros pour être recyclés Résumé : De nombreux utilisateurs de Windows sont habitués à un problème où leur ordinateur s'éteint de manière aléatoire, affichant un BSOD (Blue Screen...article suivant
6 Solutions efficaces à l'erreur PAGE_FAULT_IN_NONPAGED_AREA Résumé : De nombreux utilisateurs de Windows sont habitués à un problème où leur ordinateur s'éteint de manière aléatoire, affichant un BSOD (Blue Screen...
About Bitwar Data Recovery
3 Steps to get back 500+ kinds of deleted, formatted or lost documents, photos, videos, audios, archive files from various data loss scenarios.
Learn More
