[FIXED] Time Machine Not Working after Mojave Update Issue on Mac
Résumé: Le contenu ci-dessous montrera quelques solutions simples pour corriger Time Machine ne fonctionne pas après la mise à jour de Mojave sur Mac et récupérer toutes les données perdues avec Bitwar Data Recovery Software for Mac!
Table des matières
Problème de mise à jour : Time Machine ne fonctionne pas après la mise à jour de Mojave
Mac OS Mojave est le système d'exploitation le plus préféré sur Internet en raison de son système d'exploitation rapide. Il fournit des fonctionnalités uniques telles que le mode sombre, le Finder, les améliorations, les piles, les améliorations de capture d'écran, etc. Cependant, certains utilisateurs de Mac peuvent rencontrer des problèmes tels que le blocage de la page de connexion, le blocage du disque dur ou un problème d'application tierce, mais le Time Machine ne fonctionne pas est le problème majeur.
Si vous êtes l'utilisateur malchanceux confronté à ce problème, ne vous inquiétez pas ; nous allons vous montrer toutes les solutions simples pour réparer la machine à remonter le temps qui ne fonctionne pas après la mise à jour de Mojave dans l'article ci-dessous !
Solutions simples pour réparer la Time Machine ne fonctionnant pas après le problème de mise à jour de Mojave
Solution 1 : Configurer Time Machine
Les utilisateurs de Mac déclarent être confrontés à ce problème lorsqu'ils essaient de sauvegarder leurs données avec Time Machine. Par conséquent, suivez les étapes ci-dessous pour résoudre le problème Time Machine :
Step 1: Choose Préférence systèmes de la menu.
Step 2: Choose Machine à remonter le temps and select the Turn Off option.
Step 3: Proceed to Macintosh HD, puis sélectionnez Library and Preferences.
Step 4: Retirer le com.apple.TimeMachine.plist fichier de la Preferences dossier.
Step 5: Select the Préférences de temps option et redémarrez le Machine à remonter le temps again.
Step 6: enregistrez la sauvegarde Time Machine sur un autre lecteur externe et démarrez le processus de sauvegarde.
N'oubliez pas de suivre attentivement les étapes ci-dessus pour éviter toute perte de données sur la Time Machine !
Solution 2 : Utilitaire de terminal
Mac OS Mojave ne prend pas en charge la commande de l'utilitaire Terminal avec Time Machine. Par conséquent, lorsque vous excluez le $ sudo tmutil listbackupscommande du Terminal, vous recevrez le message d'erreur : L'opération n'a pas pu être terminée car 'tmutil' n'a pas pu accéder à l'application privée sur le disque de sauvegarde.
Alors suivez les étapes ci-dessous pour surmonter cette erreur dès que possible !
Step 1: Choose Préférences de système from Menu.
Step 2: Choose the Sécurité et confidentialité option.
Step 3: Du Privacy onglet, choisissez Terminal à ajouter à la liste des applications pouvant accéder au dossier de candidature.
Récupérer des données avec l'outil de récupération de données Mac
We recommend using Bitwar Data Recovery Software for Mac car il fournit un outil de récupération puissant qui peut facilement restaurer tous les fichiers à partir de périphériques de stockage internes ou externes sur Mac.
Étapes pour récupérer les données perdues de til Mac :
Step 1: Proceed to Bitwarsoft Download Center pour télécharger l'outil de récupération de données Mac.
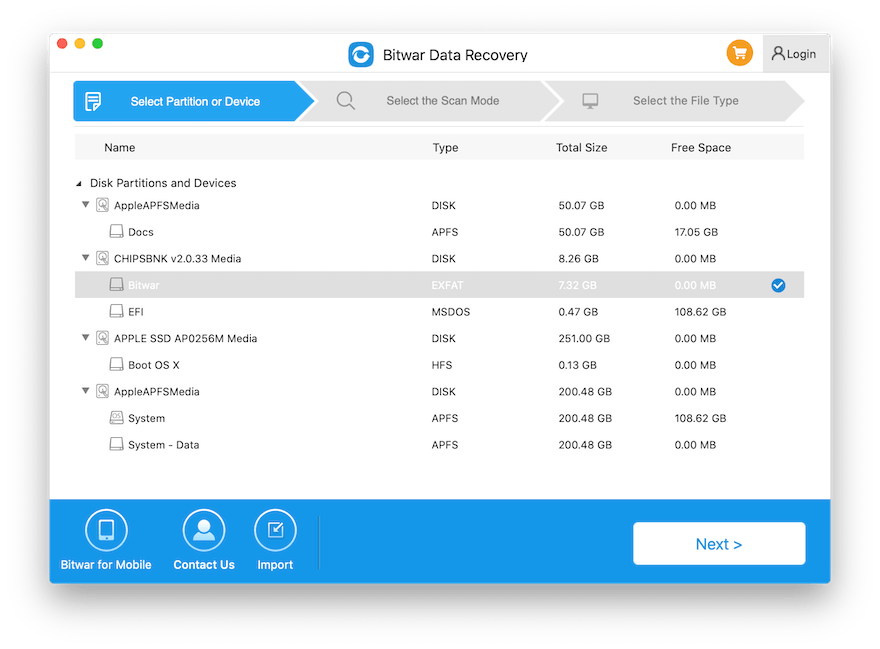
Step 2: Launch the recovery tool and choose the partition où vous avez perdu votre fichier. Cliquez ensuite sur Suivant.

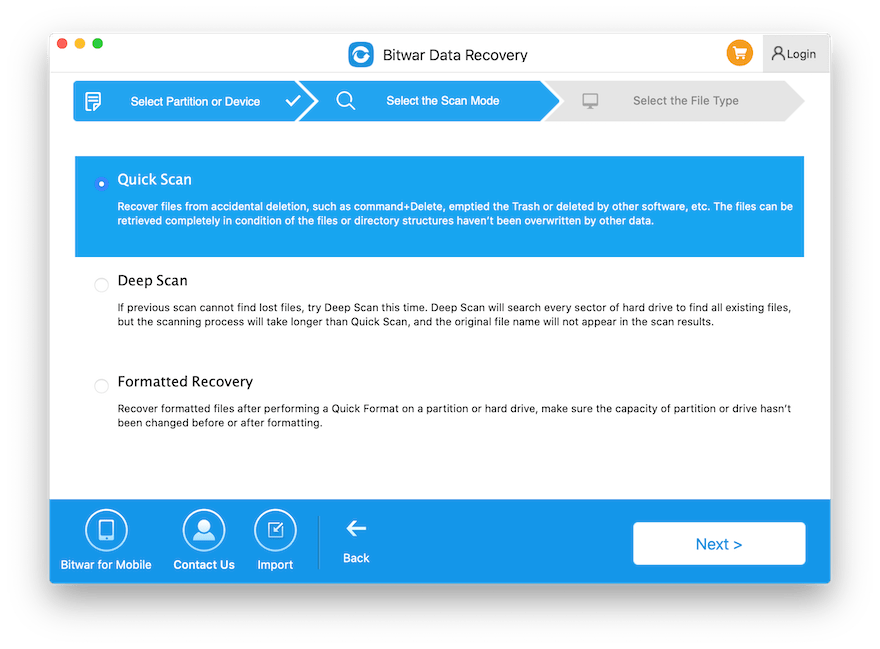
Step 3: Select the scan mode and click Suivant again.

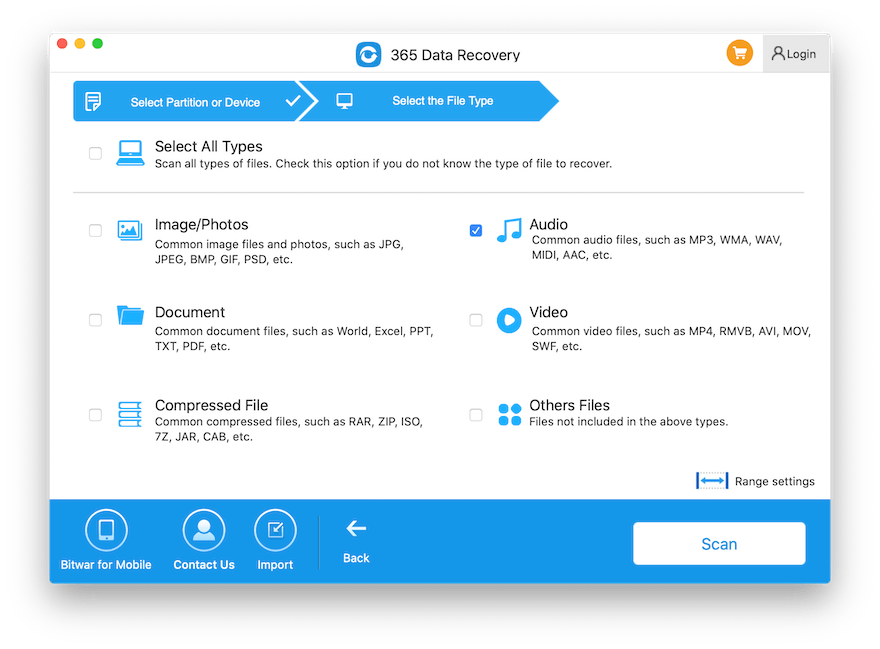
Step 4: Choose the Type de fichier du fichier que vous avez perdu et cliquez sur leSuivant button.

Step 5: Aperçu du résultats de l'analyse and choisir le fichier vous avez besoin. Enfin, cliquez sur recover pour démarrer le processus de récupération des données.

Fix-It Now!
Le Mac OS Mojave est l'un des meilleurs systèmes pour les appareils Mac. Néanmoins, cela peut parfois causer des problèmes mineurs, tels que Time Machine ne fonctionnant pas après la mise à jour de Mojave, alors n'oubliez pas de suivre les solutions guidées ci-dessus pour le résoudre le plus rapidement possible. De plus, s'il y a des données perdues pendant le processus, utilisez Bitwar Data Recovery for Mac pour récupérer les données perdues !
Article précédent
Quoi de neuf dans Bitwar Android Data Recovery V5.3.5 Résumé: Le contenu ci-dessous montrera quelques solutions simples pour réparer Time Machine qui ne fonctionne pas après la mise à jour de Mojave sur Mac...article suivant
4 Effective Solutions To Fix Error Code -43 Issue On Mac Résumé: Le contenu ci-dessous montrera quelques solutions simples pour réparer Time Machine qui ne fonctionne pas après la mise à jour de Mojave sur Mac...
About Bitwar Data Recovery
3 Steps to get back 500+ kinds of deleted, formatted or lost documents, photos, videos, audios, archive files from various data loss scenarios.
Learn More
