How To Fix The Issue This PC Can’t Run Windows 11
Table of Contents
Why Can’t Your PC Run Windows 11?
Microsoft promises to provide free upgrades for Windows 10 users. However, not every Windows 10 computer is eligible for the upgrade, and your computer needs to meet the minimum system requirements for Windows 11, otherwise, you may receive This PC can’t run Windows 11 while installing.
Users can run the official PC Health Check to check if their PC is ready. Or you can refer to the following minimum hardware requirements:
- Processor: 1 gigahertz (GHz) or faster with two or more cores on a compatible 64-bit processor or system on a chip (SoC).
- RAM: 4 gigabytes (GB) or greater.
- Storage: 64 GB* or greater available storage is required to install Windows 11
- Additional storage space might be required to download updates and enable specific features.
- Graphics card: Compatible with DirectX 12 or later, with a WDDM 2.0 driver.
- System firmware: UEFI, Secure Boot capable
- TPM: Trusted Platform Module (TPM) version 2.0.
- Display: High definition (720p) display, 9″ or greater monitor, 8 bits per color channel.
- Internet connection: Internet connectivity is necessary to perform updates, and to download and use some features.
- Windows 11 Home edition requires an Internet connection and a Microsoft Account to complete device setup on first use.
Most Windows 10 computers can meet these requirements. But what really make the upgrade problem tricky are the requirements for UEFI, Secure Boot, and TPM 2.0. So this article will also focus on how to solve these problems and make your computer to run Windows 11 smoothly.
Methods to Fix This PC can’t run Windows 11
Method 1: Enable Secure Boot
Sometimes, you may receive a message saying The PC must support Secure Boot, which means you need to manually enable Secure Boot. Then the first thing you need to do is to check the status of Secure Boot on your PC with the steps below:
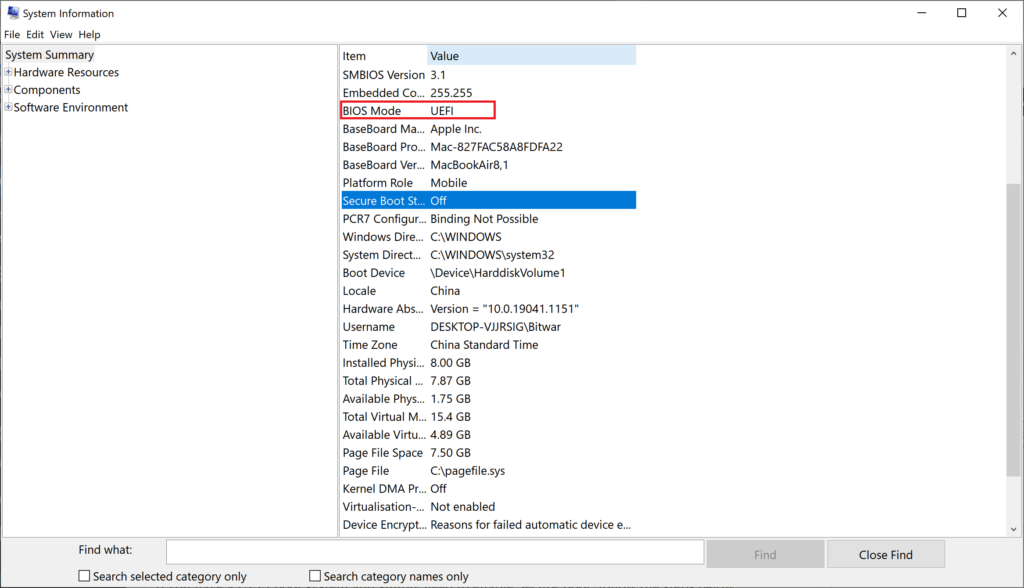
- Press Win + R to open the Run window, enter msinfo32 and hit Enter to open the System Information window.
- Then find Secure Boot State on the right panel. If it shows On, it is enabled already; If it reads Off, you can continue to check BIOS Mode.
- Then, if the BIOS Mode is UEFI, you can enable Secure Boot manually, or else you need to switch to UEFI first.

If your computer has a UEFI boot system and you just simply need to enable Secure Boot, follow the steps below:
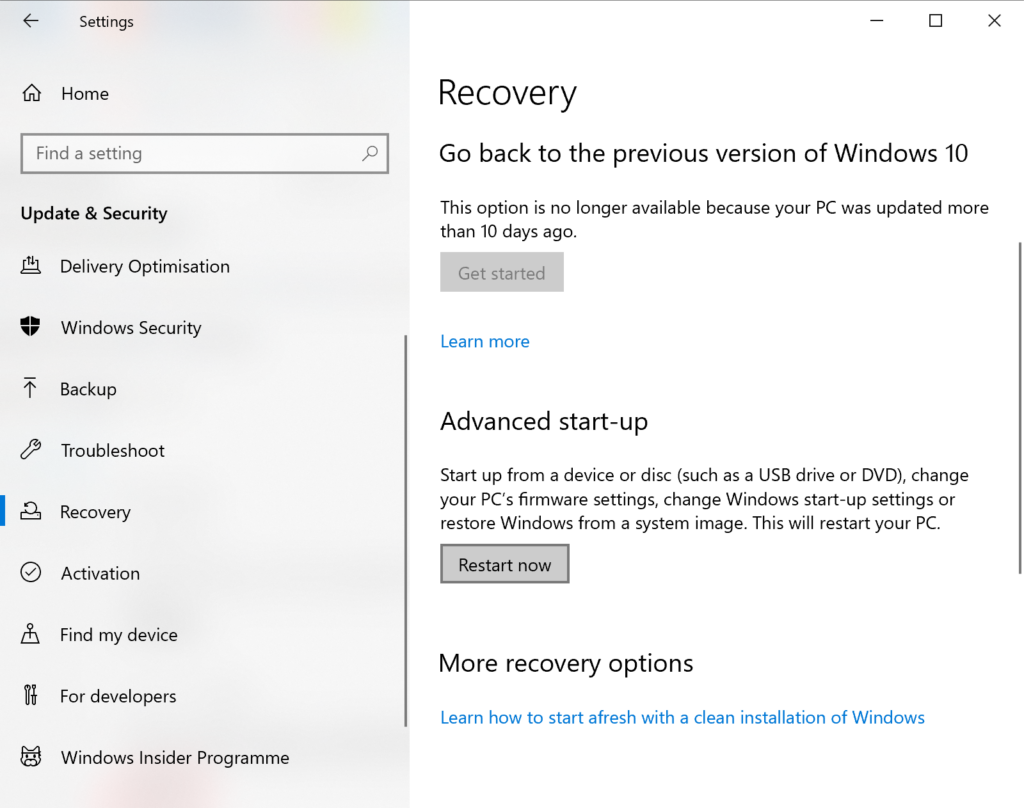
- Press Win + I to open Settings > Update & Security > Recovery.
- Find and select Restart now under the Advanced startup section.

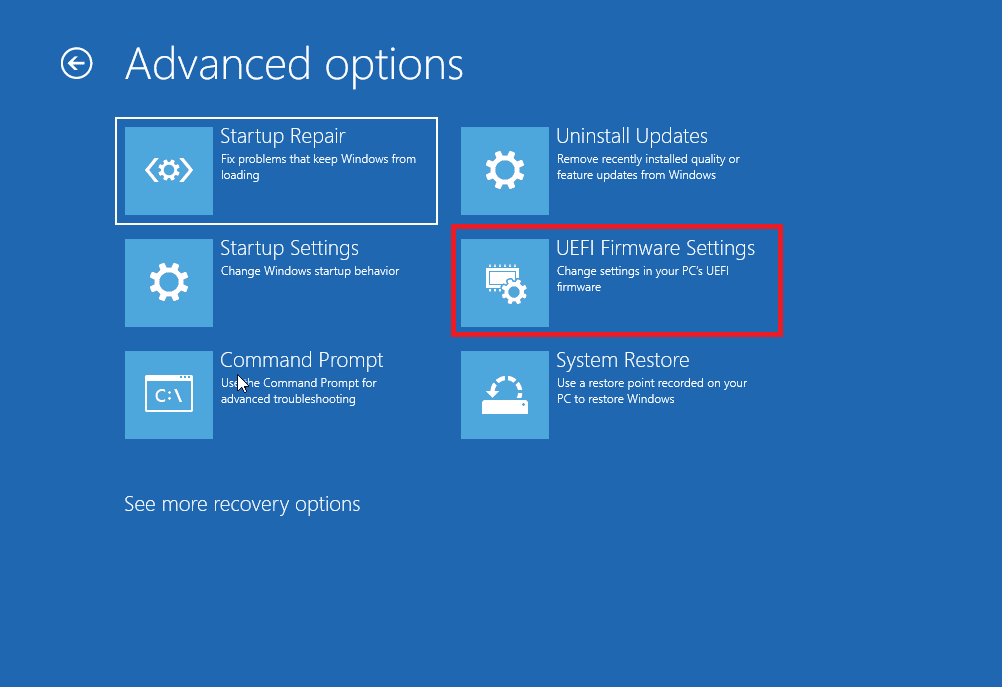
- When the computer boots into Windows 10 recovery environment, go to Troubleshoot > Advanced options > UEFI Firmware settings.

- In the UEFI settings, go to the Security tab, select Secure Boot and make it Enabled.
- Save the settings and exit, then the computer will reboot into Windows with Secure Boot enabled.
Method 2: Check TPM
Windows 11 upgrade requires Trusted Platform Module (TPM) version 2.0, which is a security module soldered to the motherboard in the form of a chip. If you run Windows 11 without the TPM chip, your computer may be at some risk.
Press Win + R, type in tpm.msc in the textbox and press Enter. If the version is lower than 2.0, or it says Compatible TPM cannot be found, then you are not allowed to upgrade to Windows 11.
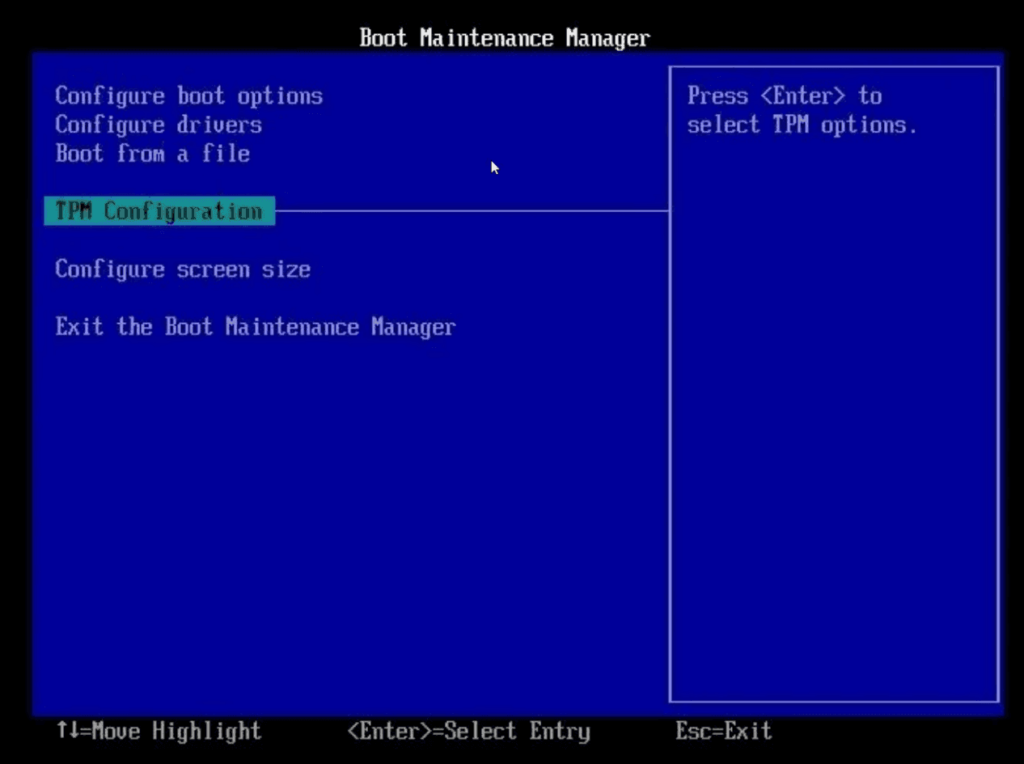
In this case, maybe your Windows CPU has an integrated TPM 2.0 module inside but just cannot detect it. So you can enter the BIOS screen during boot-up, and enable the TPM feature (generally referred to as Trust Computing in BIOS).
Method 3: Change Registry
If the hardware of your computer is eligible for Windows 11 upgrade and you still want to try the new system without replacing your device, you can try to bypass the secure boot and TPM 2.0 check, and install Windows 11 on an unsupported computer. But this way may cause you to miss important security fixes and Windows updates. If you still want to have a try, here are the steps:
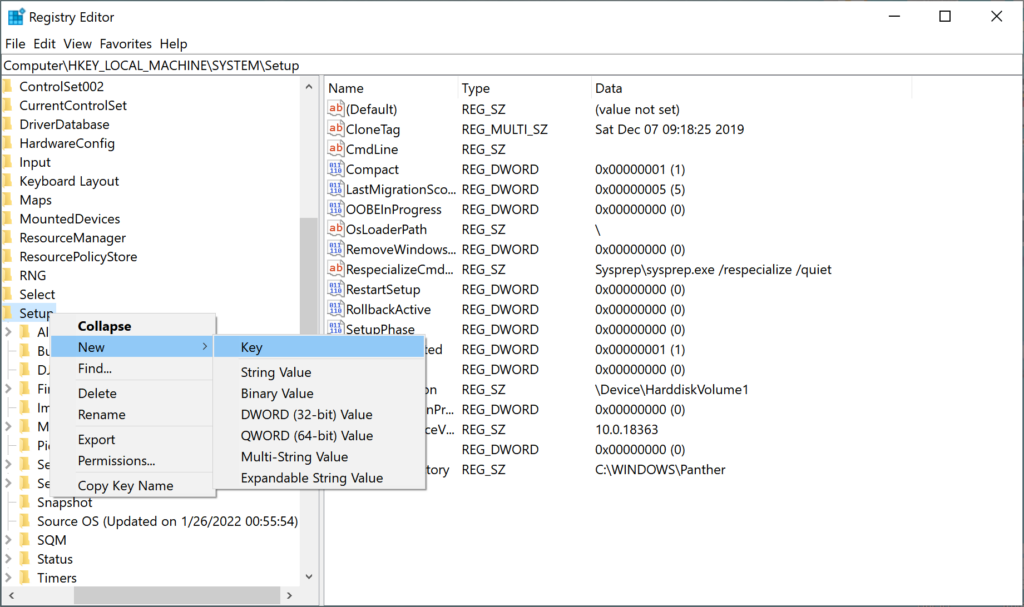
- Press Win + R to open the Run window, enter regedit and hit OK.
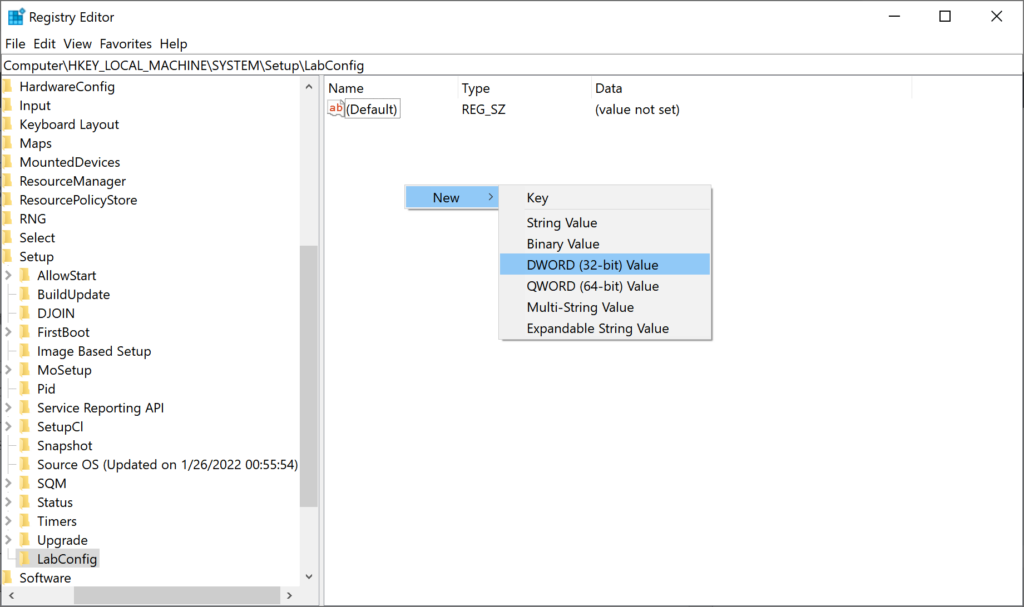
- In the popping-up Registry Editor, navigate to Computer\HKEY_LOCAL_MACHINE \SYSTEM\Setup, and right-click Setup > New > Key to create a new key, and name it as LabConfig.

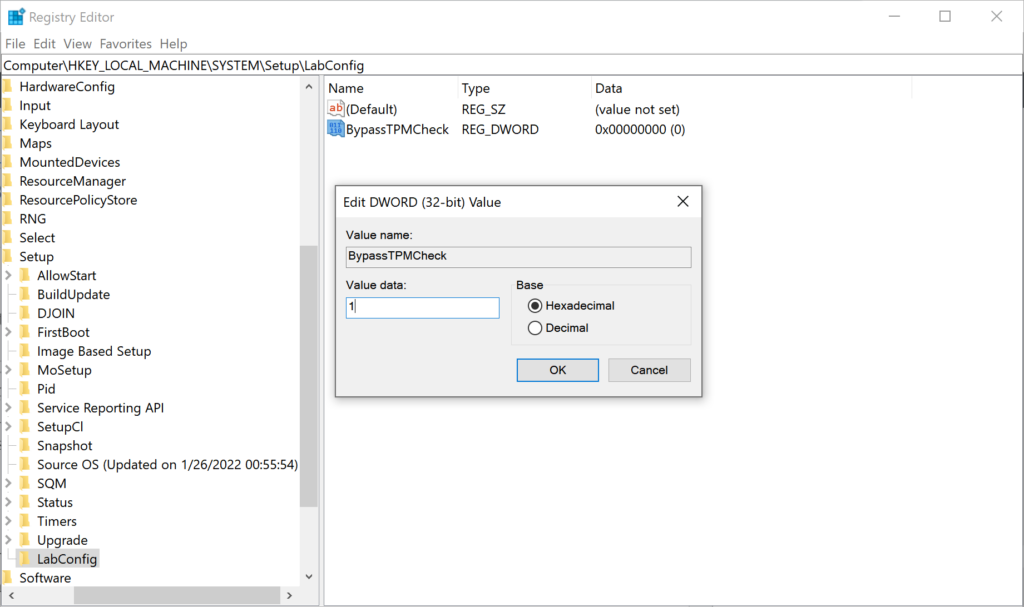
- Under the new key, right-click the blank and choose a new DWORD (32-bit) Value and name it as BypassTPMCheck.

- Double-click it and change the Value data into 1, then hit OK.

- Create another DWORD (32-bit) in the same way, and give it the name BypassRAMCheck. And change its Value data into 1 and click OK.
- Similarly, create a DWORD (32-bit) as SecureBootCheck and change its Value data into 1.
- After that, exit and try installing Windows 11 again.
Conclusion
As a brand new and much changed operating system, many users are interested in Windows 11 and want to install it. However, due to the existence of minimum system requirements, many users have received This PC can’t run Windows. This article shares three methods to fix the issues to successfully install Windows 11. In addition, we suggest you use our Bitwar Data Recovery Software to backup your important data to prevent data loss during the above three methods mentioned.
Previous Article
5 Ways To Take A Screenshot On Mac Summary: As the successor to Windows 10, Windows 11 offers radical changes to the user interface as well as many...Next Article
Mail App Is Not Working On Windows 10: System Error Can’t get mail Summary: As the successor to Windows 10, Windows 11 offers radical changes to the user interface as well as many...
About Bitwar Data Recovery
3 Steps to get back 500+ kinds of deleted, formatted or lost documents, photos, videos, audios, archive files from various data loss scenarios.
Learn More
