How to Fix the 0xA0000001 Issue
Summary: There are several BSOD problems that you may encounter when booting your computer, such as 0x000000c5, which we have expounded on several solutions to. In this article, we are going to explain how to solve another BSOD problem,0xA0000001, which may well come up when the computer is booting or when users are attempting to render a video using some editing software. Besides, in case that you run into data loss, a common problem by which the 0xA0000001 is often accompanied, we also explain how to use our effective and reliable data recovery tool, Bitwar Data Recovery, to bring back your valuable data.
Table of Contents
What’re the Causes of the 0xa0000001 Issue?
As it turns out, the 0xA0000001 issue may occur on account of the following several causes:
- Corrupted/outdated GPU driver
- UEFI/BIOS settings inconsistency
- Corrupted operating system files
- Anti-virus software interference
How to Solve the 0xa0000001 Issue?
Method 1: Install All Pending Windows Updates
Given the fact that Windows 10 may well cause a bug that produces this sort of BSOD issue with some GPU model, we recommend you start fixing the 0xA0000001 problem by installing all pending Windows updates.
Some users have reported that the issue was solved entirely after they have forced the installation of all pending Windows updates.
If you are in a similar scenario and the computer has pending Windows updates, use the instructions below to install all pending updates :
Step 1: Press Win + R to open up the Run box.
Step 2: Type in ms-settings:windowsupdate in the run box and then press Enter to open up the Windows Update window.
Step 3: On the right pane of the window, click on the Check for updates button to start the scan.
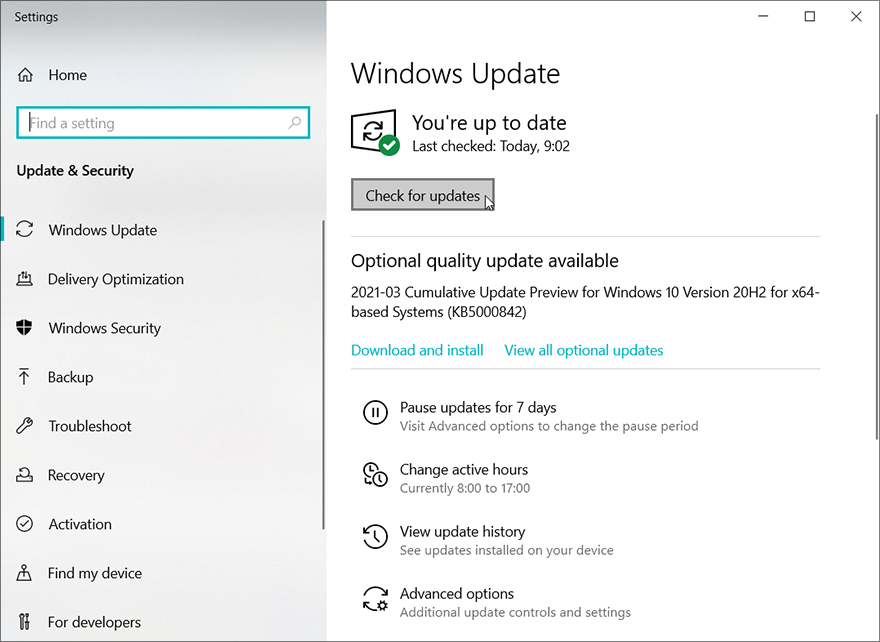
Step 4: After the initial scan has finished, follow the on-screen instructions to install all pending updates.
Step 5: After you have succeeded in installing all pending updates. Restart your computer and check whether the 0xa0000001 issue is fixed.
Method 2: Remove the 3rd Party Antivirus Software
Based on reports provided by users, one of the most common causes that might wind up causing the 0xa0000001 issue is an overprotective anti-virus software that brings about a critical kernel process. Generally, AVG, Kaspersky, and Comodo AV are the most common culprits.
If the computer is actually running a 3rd party antivirus that might be responsible for the 0xa0000001 issue, you could uninstall the current 3rd party suite to see whether the problem is fixed. Refer to the following instructions to learn how to uninstall the 3rd party anti-virus software.
Step 1: Press Win+ R to open the Run box.
Step 2: Next, type in appwiz.cpl and then press Enter to open the Programs and Features window.
Step 2: In the Programs and Features window, scroll through the list of installed applications to locate the anti-virus software you want to uninstall.
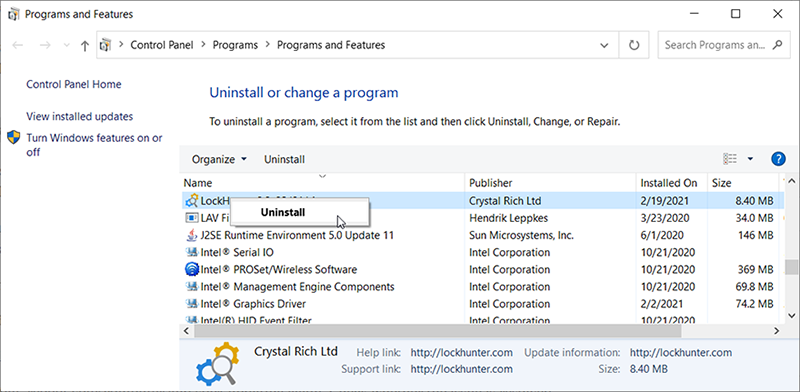
Step 3: Right-click on the anti-virus software and then choose Uninstall from the drop-down menu.
Step 4: In the uninstallation window, follow the on-screen instructions to complete the uninstallation and then restart your computer.
Method 3: Perform a Clean Boot
If you’re not using an anti-virus program and the method mentioned above fails to work, it’s likely that you’re running into a different 3rd party interference that triggers the 0xa0000001 issue. Since there are a lot of different potential causes of this problem, you should try running a clean boot and check whether the problem persists.
Refer to the following instructions:
Step 1: Press Windows + R to open the Run box, type in msconfig and then press Enter.
Step 2: Switch to the Services tab.
Step 3: Check off the box next to Hide all Microsoft services option.
Step 4: Click on the Disable all button and then OK.
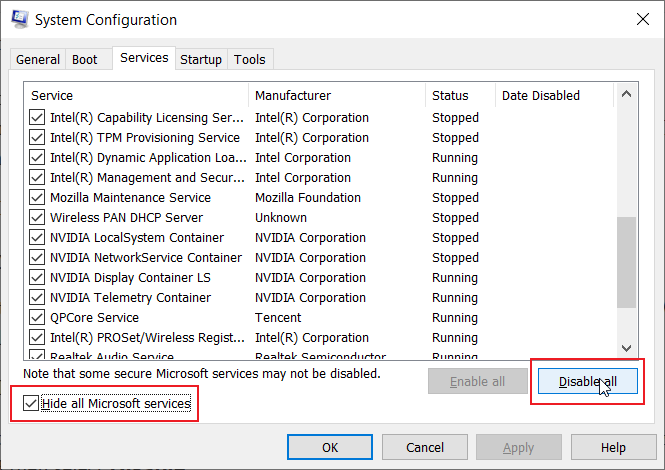
Step 5: A prompt will come up asking when to restart. choose Restart later.
Step 6: Relaunch System Configuration again by using the same steps mentioned above and then switch to the Startup tab.
Step 7: Click on the Open Task Manager button.
Step 8: Right-click on and Disable startups with High Startup impact.
Step 9: Reboot your computer to check whether the problem persists. After that, repeat the same steps to re-enable those disabled programs one by one until you find the faulty program and eliminate it.
Method 4: Update GPU Driver
Many users have attested in their posts that incompatibility between GPU driver and the computer can lead to varied, frequent BSODs (not least when you’re using an AMD drive). And some users that were dealing with the 0xa0000001 issue have confirmed that in their respective cases, the problem was caused by a corrupted or outdated GPU driver.
If you are suspicious of your GPU driver on certain grounds, such as the fact that it hasn’t been updated for a long time, we would like to suggest you fix this issue by updating the GPU drivers and the physics module that the computer is currently using (this is critical in case that you run into the issue only when running a game or an application that demands a lot of resources).
If you’re not sure how to remove corrupted drivers before reinstalling them, use the instructions listed below step by step to learn how to update current GPU drivers via Device Manager:
Step 1: Press Win + R to open a Run box.
Step 2: Type in devmgmt.msc in the box and then press Enter to open Device Manager.
Step 3: In the Device Manager Window, scroll through the list of installed devices to expand Display Adapters.
Step 5: After that, a prompt will pop up. Click on the Search Automatically for updated driver software option.
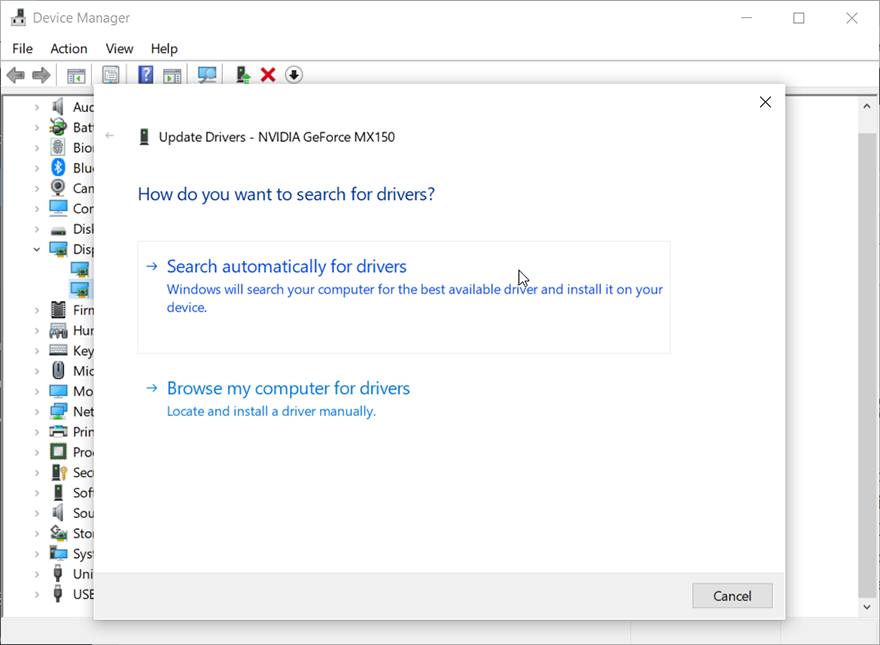
Step 6: After the scan is complete, follow the on-screen instructions to install the latest GPU driver.
Step 7: If a new GPU driver version is successfully installed, you could reboot your computer to check whether the problem is fixed.
Method 5: Reset BIOS / UEFI to the Defaults
If none of the aforementioned methods serves you when you try fixing the 0xa0000001 issue, you could focus your attention on another possible issue related to your BIOS or UEFI settings.
In the case that the issue is created by a BIOS / UEFI error, you can fix the issue by changing the BIOS / UEFI to the default settings. Bear in mind that based on the specification you’re using, the instructions of doing this may vary.
But despite the complexity of users’ different specification types, we’ve posted two different sub-methods that will explain to you how to reset BIOS or UEFI settings:
A. Change the UEFI Settings to Default
Step 1: Press Win + R to open the Run box.
Step 2: Type ms-settings: update & security in the box and then press Enter.
Step 3: In the Update & security window, click on Recovery.
Step 4: Wait for your computer reboot. It will enter into the Advanced Options menu.
Step 5: Navigate to Troubleshoot > Advanced Options and then click on UEFI/BIOS Firmware Settings.
Step 6: Click on Restart to enter the UEFI firmware settings menu. After that, your computer will restart into the UEFI / BIOS setup.
Step 7: Pore over the menus and select Restore Defaults.
Step 8: Confirm the reset of the UEFI settings, then reboot your computer to make it to boot in the normal way.
B. Resetting BIOS Settings to Default
Step 1: Restart your machine and then press the pre-set Boot key repeatedly.
Step 2: After accessing BIOS settings, look for a menu named Setup Defaults (other names such as Setup Default. Reset to Default, or Factory Default). Then select the Load Setup Defaults option.
Step 3: Confirm and save the changes you’ve made, exit the BIOS menu and then wait for the system to reboot.
Method 6: Reset Every OS Component
If all the methods mentioned above fail, you may be dealing with a systemic issue that you are not able to resolve in a conventional way. In this case, the only method that we recommend you to try is to reset every Windows component to fix system file corruption that might lead to the 0xA0000001 issue.
When it comes to resetting a Windows version to the latest version available, you could try the following two methods:
- Repair install – This is the operation we would like to recommend since it will fix any type of corruption in Windows 10. You will need a compatible installation media. The major advantage of using this method is that users will not lose games, applications, and personal media stored on the operating system drive.
- Clean install – This is the easiest operation because the compatible installation media are not required (you can perform this operation from the GUI menu). However, the main disadvantage of this method is that you must back up your C:\ drive in advance. Otherwise, you would lose all the games, applications, personal media and user preferences.
Method 7: Replace or Return the GPU
In the end, there is a faint possibility that your computer is having a hardware issue. In most cases, repair installing or clean installing should be able to resolve all issues related to software. Hence if the problem persists, the most likely culprit is a faulty GPU.
There are a lot of user reports revealing that a faulty AMD GPU winded up, causing the 0xa0000001 issue.
To check whether that’s the problem facing you, you could try running a GPU diagnostic tool or sending it for repairs if the GPU is still under warranty.
Recover Lost Data Using Bitwar Data Recovery
Besides the unexpected blue screen with which the 0xA0000001 is accompanied, this error could induce another tricky problem, data loss. Hence, to help users iron out this particular problem, we would like to introduce our reliable and effective data recovery tool, Bitwar Data Recovery.
With the help of it, you will be able to recover files that either got deleted incidentally or vanished mysteriously. Refer to the following instructions to learn how the program works like magic.
Step 1: Download Bitwar Data Recovery from Bitwarsoft Download Center and install it on Windows PC.
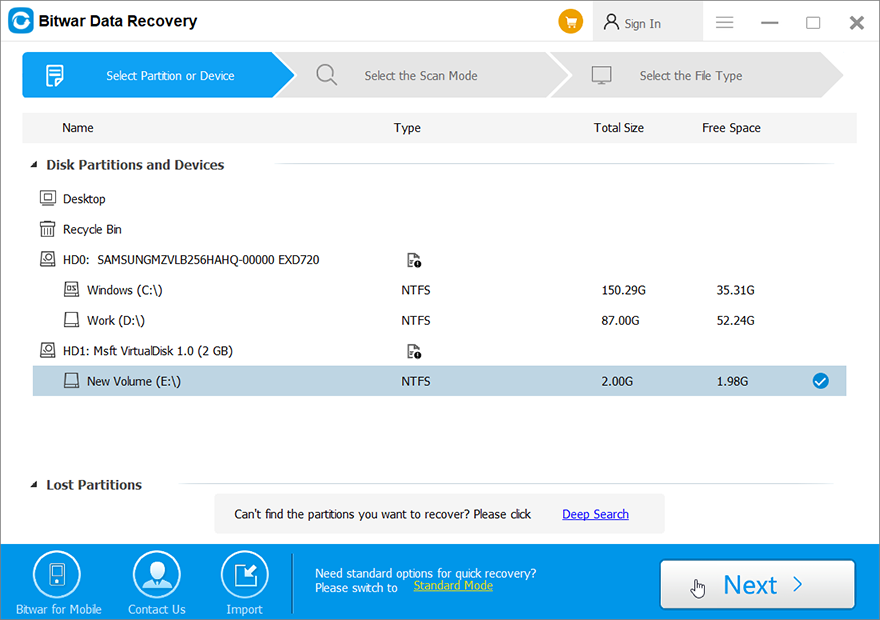
Step 2: Launch the program and then select the disk drive where the missing files were stored and then click Next.
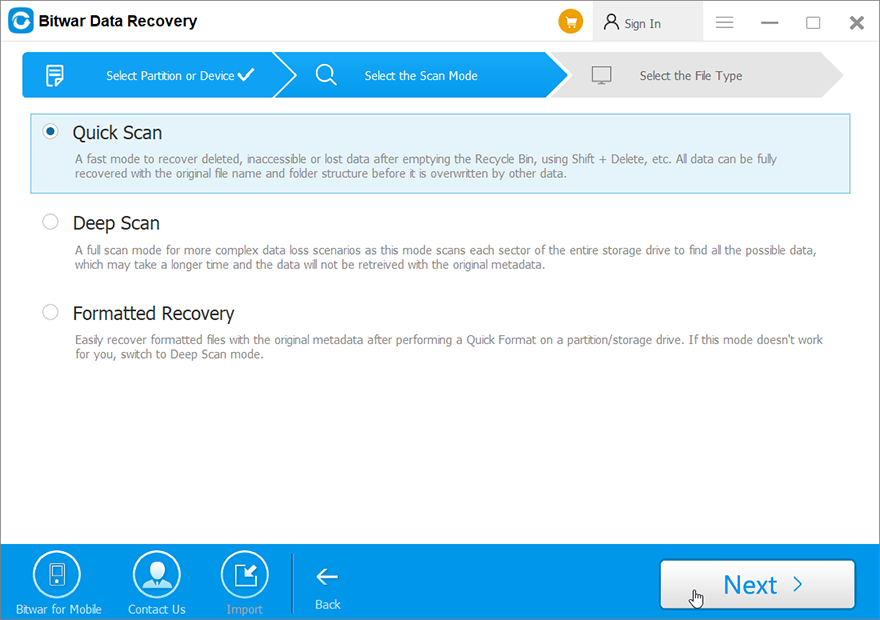
Step 3: You can choose a scan mode in this stage. We would like to recommend you to select Quick Scan, which is capable of recovering most lost files. If it doesn’t serve you well, you can return to this stage to run the software again and use Deep scan, which is more effective.
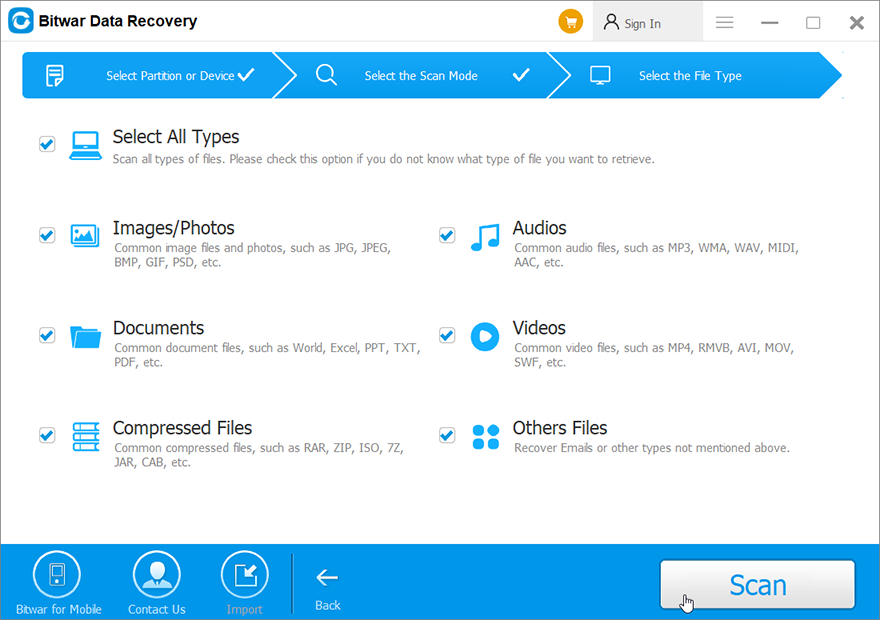
Step 4: Choose the types of files you want to recover and click Next.
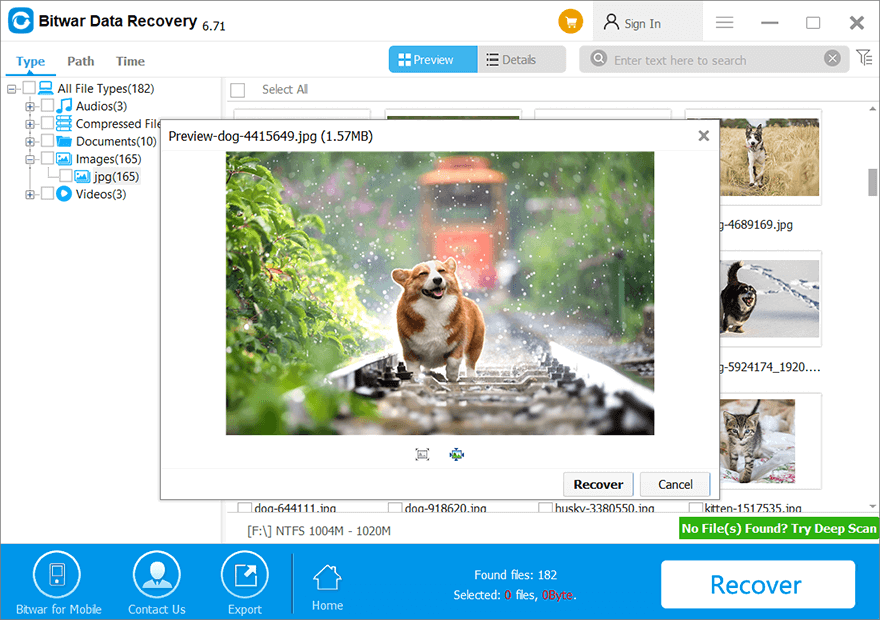
Step 5: Preview the desired files to check their intactness. Select those recoverable files and then click on Recover to initiate the recovery process.
Conclusion
In this article, we have listed solutions to a common type of BSOD problem, the 0xA0000001 issue. It’s a vexed problem since the error message doesn’t reveal much useful information. Hence, to cover as many cases as possible, we have tried to cover as many methods as possible.
Furthermore, given the possibility of data loss, we also introduce our reliable and effective data recovery tool, Bitwar Data Recovery. Users whose work is cut short because of the 0xA0000001 issue can use the tool to retrieve their valuable files.
Previous Article
4 Best Solutions To Fix External Hard Drive Access Denied Error Summary: There are several BSOD problems that you may encounter when booting your computer, such as 0x000000c5, which we have...Next Article
7 Effective Methods To Fix 0x0000003B Error On Windows Summary: There are several BSOD problems that you may encounter when booting your computer, such as 0x000000c5, which we have...
About Bitwar Data Recovery
3 Steps to get back 500+ kinds of deleted, formatted or lost documents, photos, videos, audios, archive files from various data loss scenarios.
Learn More
